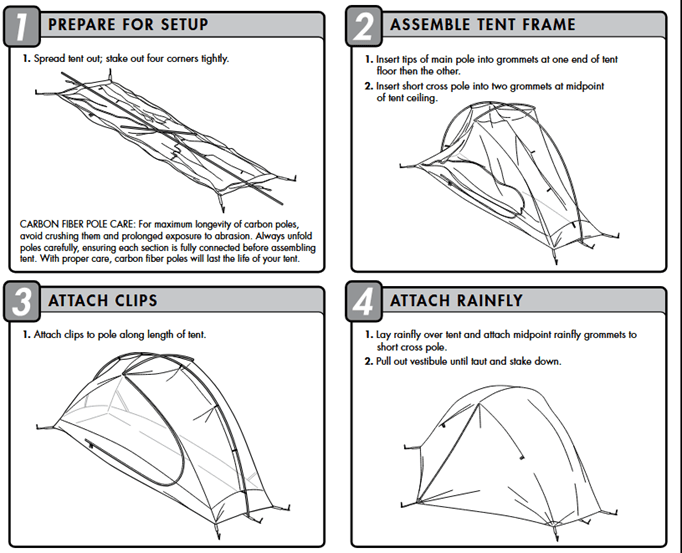
(combined with a guide to basic 3-season hiking gear)
Content of this page:
Short general Information on equipment/page Structure
Packing List 3 Season & gear rent as a table
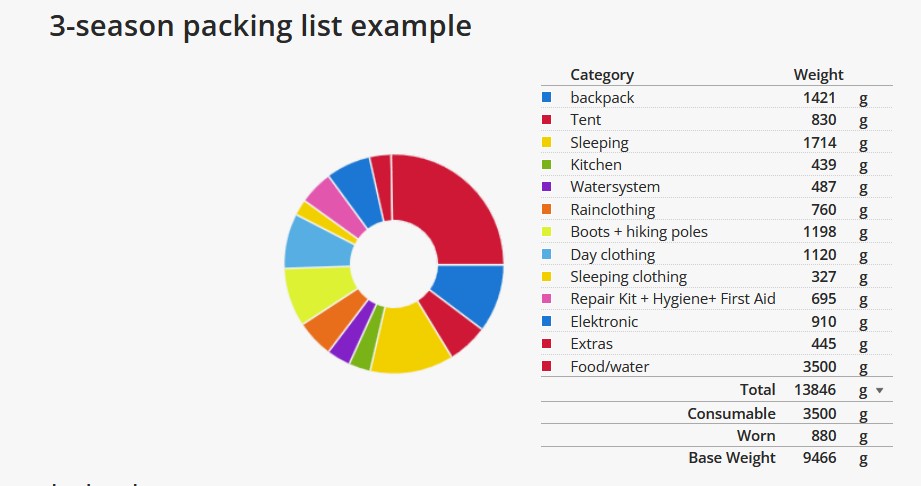
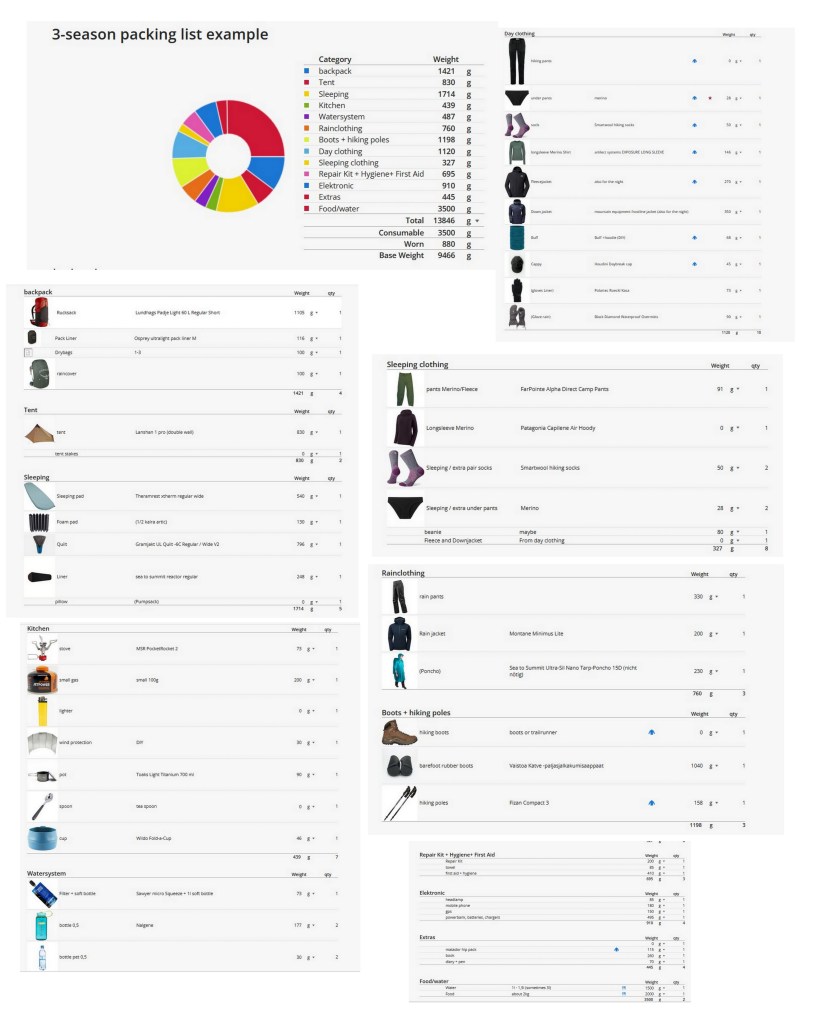
Packing List 3-season Lighterpack
7. Boots (and creative swamp boots solutions)
10. Sleeping clothes-/ spare clothes
HOW TO PACK SMART – DIFFERENT OPTIONS
General Information on Equipment/Page Structure
Like so many things in hiking, gear is a very personal choice, and I don’t want to tell you what to do. Personally, I prefer (ultra-)light gear, not only because a lighter backpack is more comfortable, but also because keeping my gear to a minimum allows me to focus more on nature and I enjoy the simplicity of having only less with me. To save a few grams, you could of course ditch your toothbrush, but the most important factor for a light base weight is the basic gear: backpack, tent, sleeping bag, and sleeping pad. You can also easily save a few grams and space regarding kitchen equipment.
- Below you find a sample packing list in table format what works also a gear-rent list.
- The checkmarks (✓) indicate that the item is available for rent, and the column next to it lists the specific product. I’ve linked many of them directly to a website so you can read more about them if needed.
- And the X-mark (✗) means you’ll need to bring that item yourself.
- The table functions also like a table of contents, and when you click on the main categories (1. Backpack, 2. Tent, etc.), you’ll be taken to the section on the page with more detailed information.
- Even if you don’t go hiking with me on that trail, maybe you can find there some interesting hiking gear & skills information, as this somehow also works as a little basic 3-season gear-guide.
- In the sections with the detailed gear information I will share a few basic thoughts on the equipment item, I’ll then introduce you in more detail to the gear you could rent. Personally, I’ve spent a lot of time thinking about gear over the past few years and have tested a lot of it to offer a solid selection of lightweight and at the same time winter-ready adjustable gear.
You can find in general a lot information on gear online, or read several books, like me. But you can also go hiking without getting too deep into gear details. The most important thing is to get out there, and it doesn’t matter whether your tent weighs 800g or 1.5 kg.
Here are four basic principles for gear to serve as a good and safe foundation for hiking:
a. Pack items in waterproof bags (sleeping gear, spare clothes, sleeping bag, etc.) –> see point 1 for more details
b. Shoes must fit well. That’s why it’s important to break in new shoes (including socks) beforehand to prevent blisters.
c. Your backpack must fit properly; it is important to adjust it correctly, make adjustments while hiking, and pack it properly (heavy items close to your back and higher up; see the end of this information blog)
d. Clothing: Comfort and protection! Base layers keep you dry and thus warm (e.g., merino), the mid-layer provides additional warmth (e.g., fleece), and the outer layer (rain jacket) protects against wind and rain. Try to avoid cotton, as it wont dry and feel cold on your body.
Packing List 3-season and gear rent as a table
| Packing List 3 Season | What you can rent | ||
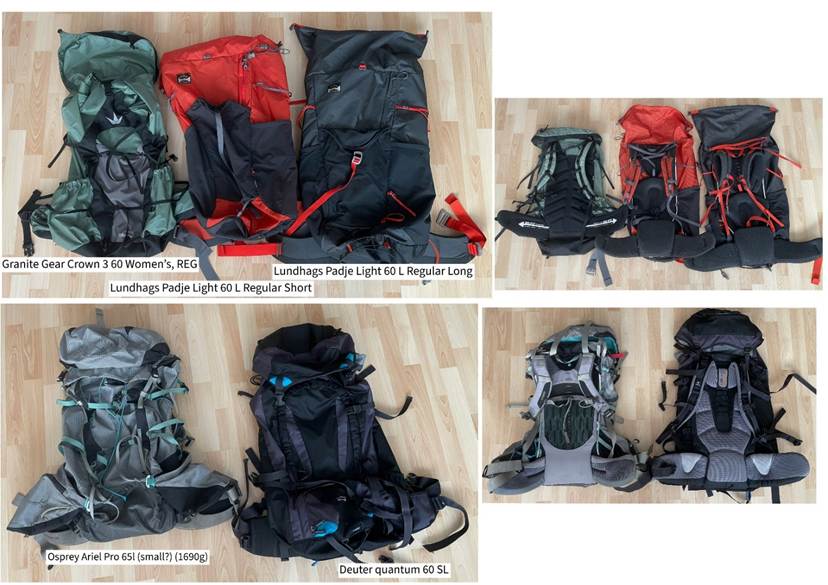
| 1.Backpack | ✓ Backpack (circa 60 l +/-) | – Granite Gear Crown 3 60 Women’s, REG (1170g) – Lundhags Padje Light 60 L Regular Short (1105g) – Lundhags Padje Light 60 L Regular Long (1115g) – Osprey Ariel Pro 65l (small?) (1690g) -Deuter quantum 60 SL (2790g) | |
| ✓ Liner/drybag big | – Osprey ultralight pack liner M (per person) | ||
| ✓ 1-3 small drybags | – 2l, 4l, 8l, drybag (per person) | ||
| ✓ raincover Backpack | 1x per person | ||
| 2. Tent | ✓ 1-2 person tent | 1x Lanshan 1 pro (double wall) (830g) –2x Lanshan 1 pro (single wall) (750g) –Durston x mid 1 (double wall) 840g) – MSR carbon reflex 1 (double wall) (800g) | |
| 3. Sleeping | ✓ Sleeping pad (3-season) | -3xTheramrest xtherm regular wide (weight 540g, R-value 7,3, 183cmx64cm) -1x Thermarest Xtherm large (weight 570g, R-value 7,3, 196cmx64cm) | |
| ✓ Foam pad (1/2) | 2x ½ thermarest z-lite sol 205 g 2x ½ kaira artic 130 g 2x kaira extreme 145 g | ||
| ✓ Sleeping bag/ Quilt (3-season) | -3x Gramjakt UL Quilt -6C Regular / Wide V2, down (796g) | ||
| ✓ Liner | -sea to summit reactor compact plus short -sea to summit reactor lightweight liner regular -sea to summit reactor regular – sea to summit reactor extreme regular -sea to summit reactor extreme long | ||
| ✗ Pillow (pumpsack) | |||
| 4. Kitchen | ✓ Stove | -2x MSR PocketRocket 2 (73g) -1x MSR PocketRocket deluxe (83g) -3x kovea spider (168g) | |
| ✗ Small gas | |||
| ✗ 2x lighter | |||
| ✓ Wind protection (stove) | DIY wind protection (3x) | ||
| ✓ pot | –TOAKS LIGHT Titanium 700 ml pot (90g) 3x | ||
| ✗ Small spoon | |||
| ✓ cup | -3x cup (wildo fold-A-cup) | ||
| 5. Watersystem | ✓ Waterfilter + soft bottle (1l) | 3x Sawyer micro Squeeze set | |
| 2x 0,5 pet bottle | |||
| ✓ 2x 0,5 Nalgene | 4 x 0,5 Nalgene | ||
| 6. Rainclothes | ✗ Rain pants/ ✓ rain skirt | 2x Northern Lite Sadehame (rain skirt) | |
| ✗ Rain jacket | |||
| ✗ Poncho | |||
| 7. Boots | ✗ Hiking boots / trailrunners | ||
| ✓ Barefoot-rubberboots Or other creative swamp solutions | Vaistoa Katve Barfußgummistiefel (1040 g) Size 38-44 | ||
| 8. Hiking pole | ✓ Hiking poles | – Black Diamon trekking pole – Fizan ultralight hiking pole | |
| 9.Day clothes | ✗ Hiking pants + underpants | ||
| ✗ Hiking socks | |||
| ✗ Longsleeve Merino shirt (or/ and t-shirt) | |||
| ✗ Fleecejacket | |||
| ✗ Rainjacket | |||
| ✗ Downjacket (3-season) | |||
| ✗ Buff | |||
| ✗ Cappy | |||
| ✗ Gloves | |||
| 10. Sleeping clothes/Extra clothes | ✗ Merino/Fleece pants | ||
| ✗ Merino-Longsleeeve | |||
| ✗ 2x extra pair of socks | |||
| ✗ 2x extra underpants | |||
| ✗ beanie | |||
| (Fleece + down jacket from the day) | |||
| 11. Repair kit | ✓ For example: Repair patch sleeping pad;Cord;Needle and thread;Tape | ||
| 12. Hygiene | ✗ Toilett paper in zipper bag | ||
| ✗ Hand desinfektion gel | |||
| ✗ Dog-bags | |||
| ✓ Trowel | 3x trowel | ||
| ✗ Pee rag | |||
| ✗ Basic/personal Hygiene stuff, like: toothbrush, toothpaste, Deo, Menstruation stuff, evtl suncreme, .. | |||
| towel | |||
| 13. First aid | ✗ Important: Pain relievers/fever reducers and medication for diarrhea/vomiting. Otherwise, bring any personal medications , plaster, blister plaster etc Tweezers (ticks)Nail scissors/nippers | ||
| 14. Electronic | ✓ Powerbank +charger | 1x Nitecore NB20000 (328g) 2x Wave Power bank 20000 mAh (385g) 2x 6700 mAh (162g) | |
| ✓ GPS-device + batteries | 1x Garmin Etrex 22x 1x Garmin Etrex 32x | ||
| ✓ headlamp + batteries | Different basic headlamps | ||
| ✗ mobile phone + charger | |||
| ✗ headphones | |||
| 15. extras | ✓ compass | ||
| ✗ Oropax? | |||
| ✓ Trailguide | |||
| ✗ Hiking journal + pen | |||
| ✗ Pocket knife | |||
| ✗ Belly bag | |||
| ✗ Something like “wilderness-wash” | |||
| ✗ “Luxury-objects” | |||
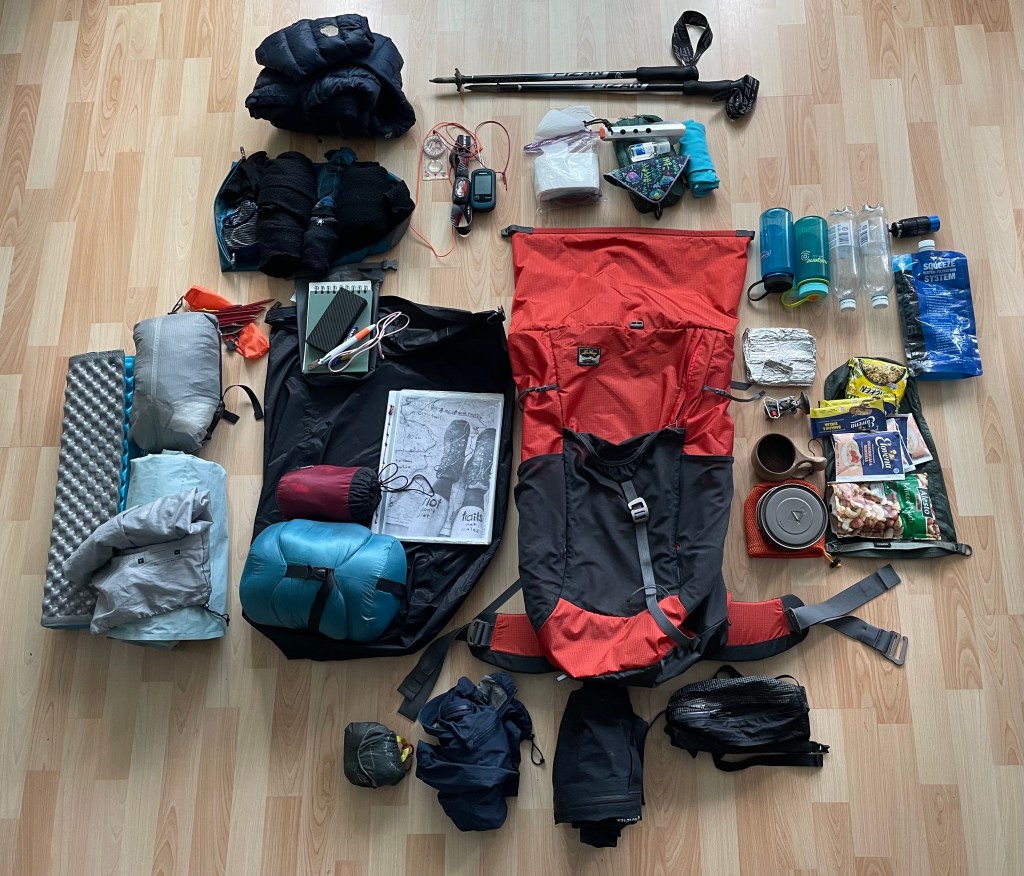
This is roughly what the pile of equipment looks from the table looks like…
Packing List 3-Season Lighterpack
On the Lighterpack website, you can create clear gear lists that include weight information. Click this link to see the sample list from the photo. You don’t have to do this, but it might give you an idea of how much my backpack weighs with all my gear.
1.Backpack
| 1.Backpack | ✓ Backpack (circa 60 l +/-) | – Granite Gear Crown 3 60 Women’s, REG (1170g) – Lundhags Padje Light 60 L Regular Short (1105g) – Lundhags Padje Light 60 L Regular Long (1115g) – Osprey Ariel Pro 65l (small?) (1690g) -Deuter quantum 60 SL (2790g) |
| ✓ Liner/drybag big | – Osprey ultralight pack liner M (per person) | |
| ✓ 1-3 small dry bags | – 2l, 4l, 8l, drybag (per person) |
Feel free to bring your own backpack if it fits you well. I have three very lightweight backpacks (first photo), one medium-weight one, and one heavy one (second photo). Except for the Granite Gear Crown, all of them have adjustable back lengths, so I’m sure one of them will fit you! At the end of this page, you’ll find a few packing tips. Due to its weight, I wouldn’t recommend the Deuter unless the others don’t fit.
Some backpacks, such as the Lundhags, have only one large main compartment, but feature spacious “pockets” on the outside made of stretchy material—for rain gear, a stove, a pot, etc. An additional top compartment, like on the other backpacks, naturally provides structure, but a single compartment often allows for the best use of space. It’s a matter of taste and habit.
Compared to the Granite Gear backpack, the Lundhags have a sturdier carrying system, which makes even slightly heavier loads comfortable to carry. For the Granite Gear, for example, a maximum of 15 kg is recommended. The other backpacks can easily carry up to 20 kg.
Back to the volume: I’d say 65 liter is the maximum, and 55 could be also enough regarding your own gear.
Liner/Drybags
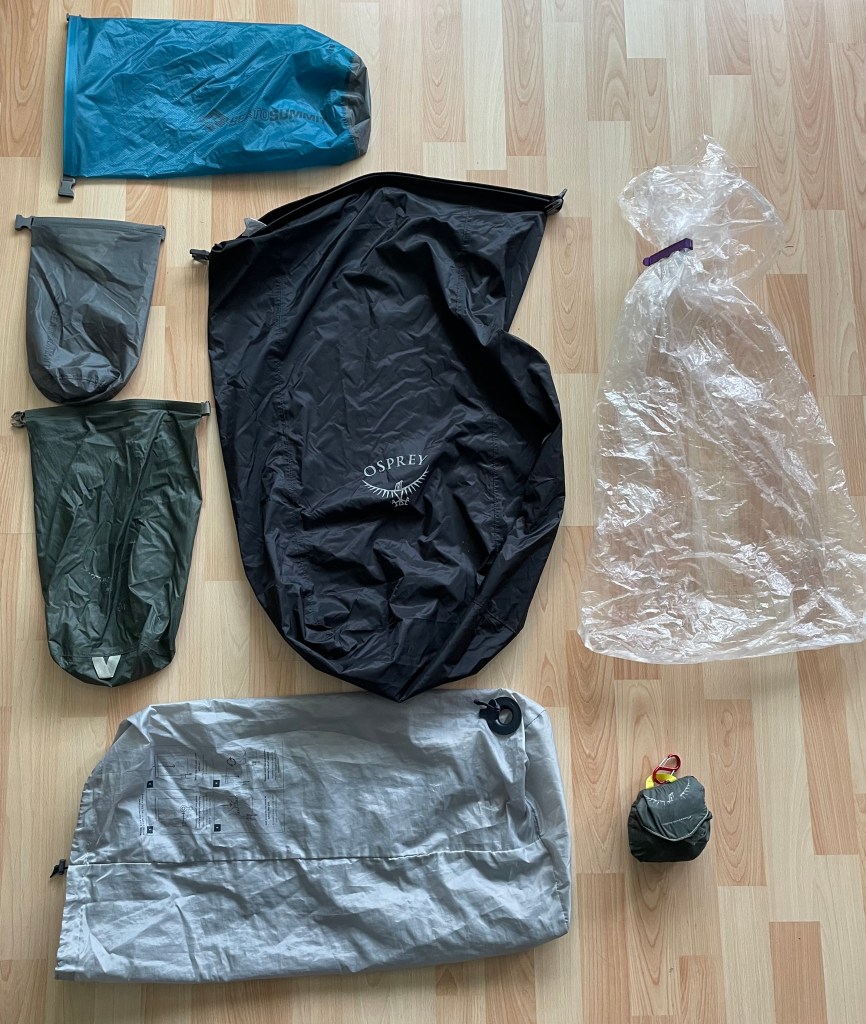
An important element in protecting against moisture.
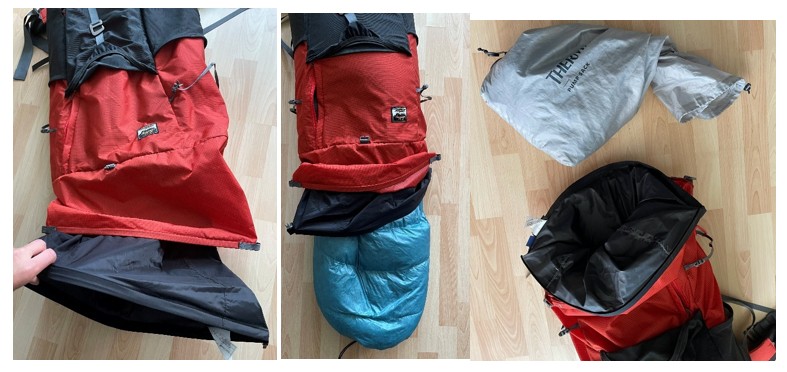
Backpacks aren’t waterproof, even with a rain cover (bottom right). That’s why some people just leave the rain cover off altogether. I still like having it, though.
The most effective solution is a large liner or dry bag for the inside of the backpack. This could be, as shown in the center of the picture, something like the Osprey Ultralight Pack Liner M with a 58-liter capacity, or, as an alternative shown on the right in the photo, a simple plastic bag made of “durable nylon polymer.” It’s cheaper, of course, but it rustles a lot. Some people also use a large trash bag. For the plastic bag, you’ll need an extra clip or rubber band to close it.
On the left, you can see three dry bags (8L, 6L, 2L). These aren’t strictly necessary if you’ve protected your gear with a large liner. However, they help keep your backpack (and tent) organized. If needed, you can use them to compress items like a down jacket, or they simply provide protection for anything you keep outside the liner. Mini-grip or plastic zip-top bags also work as an alternative.
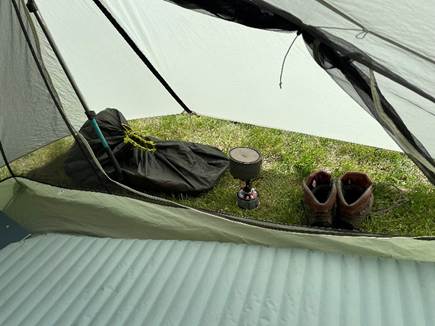
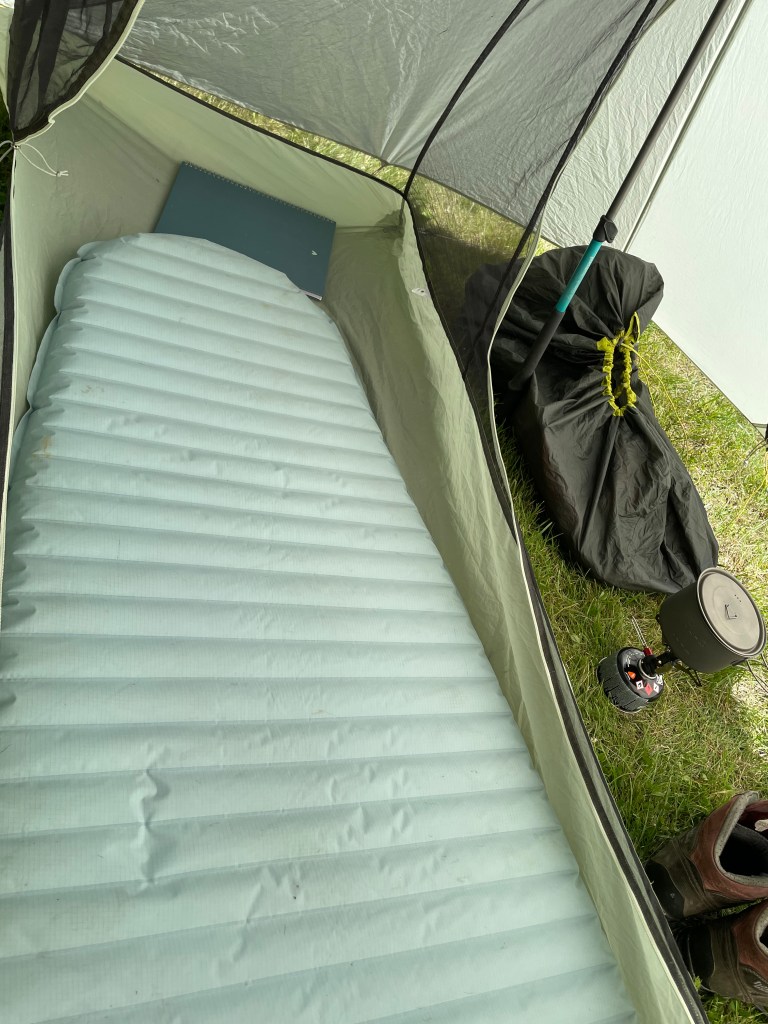
For organization: For example, one bag for sleeping clothes and a change of clothes (as an alternative, you can also put these in the pump sack of your sleeping pad, see the bottom of the photo), one for food, and one for electronics, books, etc.
2. Tent
| ✓ 1-2 person tent | –1x Lanshan 1 pro (double wall) (830g) –2x Lanshan 1 pro (single wall) (750g) –Durston x mid 1 (double wall) 840g) – MSR carbon reflex 1 (double wall) (800g) |
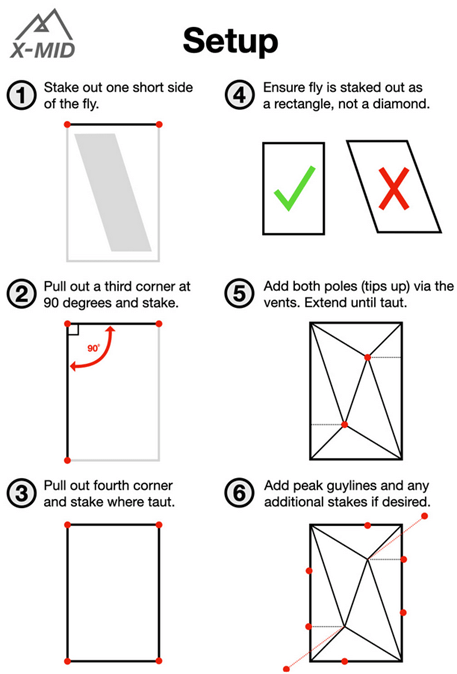
Below, I’ll introduce you to the tents I could borrow. Of course, feel free to bring your own tent or borrow one from a friend if you’re already familiar with it and feel more comfortable using it. Ultimately, it doesn’t really matter which tent you choose. They all have their pros and cons; the only important thing is that you get a little familiar with the tent before the hike so you know the basics of how to set it up. Over time, you’ll get to know the tent better, and it’s totally fine to check Google or YouTube videos for quick setup tips even during the hike.
Here are a few general facts about different types of tents:
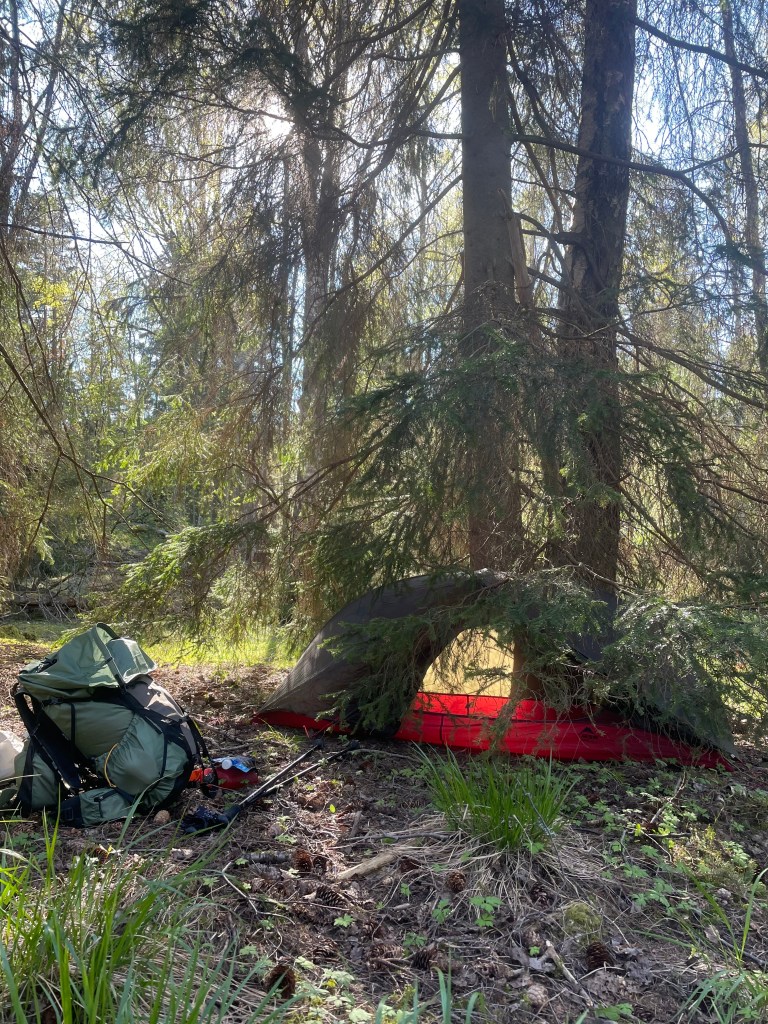
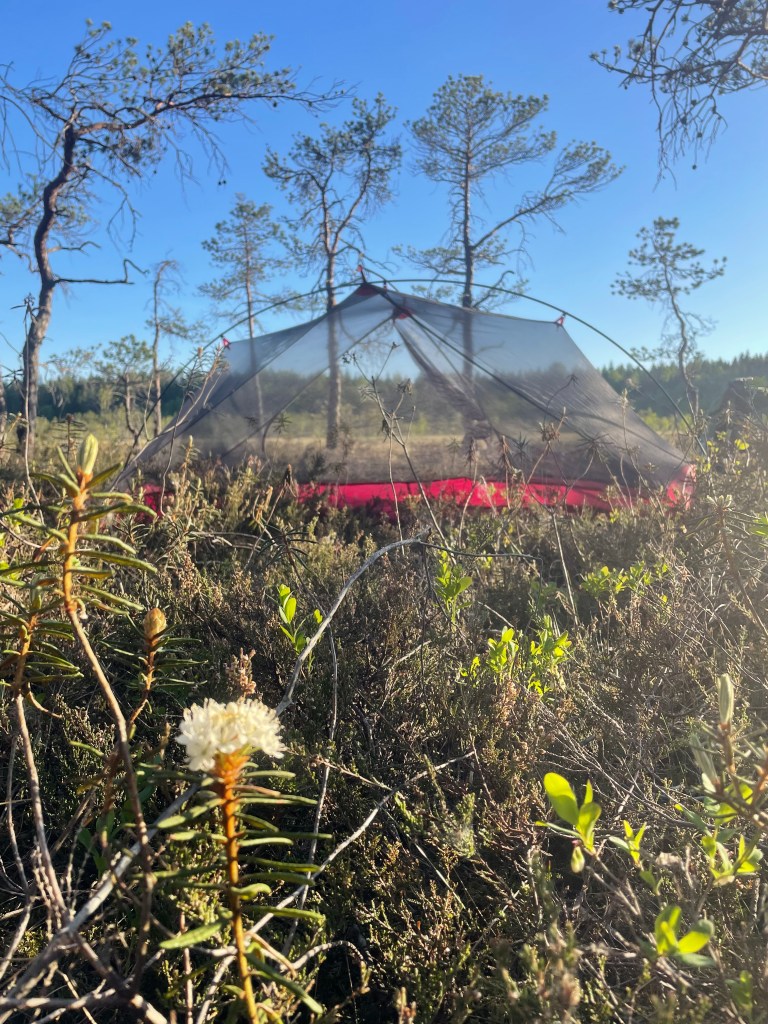
- “Freestanding” or “not freestanding”: Dome tents, for example, are often freestanding, meaning that their pole structure allows them to stand on their own without necessarily needing to be staked into the ground. The positive side of this is that you can use them also in rocky ground, where you might have struggles with stakes. The downside of dome tents is that they aren’t well-suited for areas with strong winds and if they are lightweight, they may not be able to deal with a lot of snow on them. For this trail, however, they would be well-suited, as they naturally offer more flexibility when looking for a campsite and you will always find naturally wind protected places . “Not freestanding” simply means that the tent can only be set up if it is secured to the ground with stakes and guy lines. (All my tents are “not freestanding,” partly because they all fall more into the “lightweight” category.)
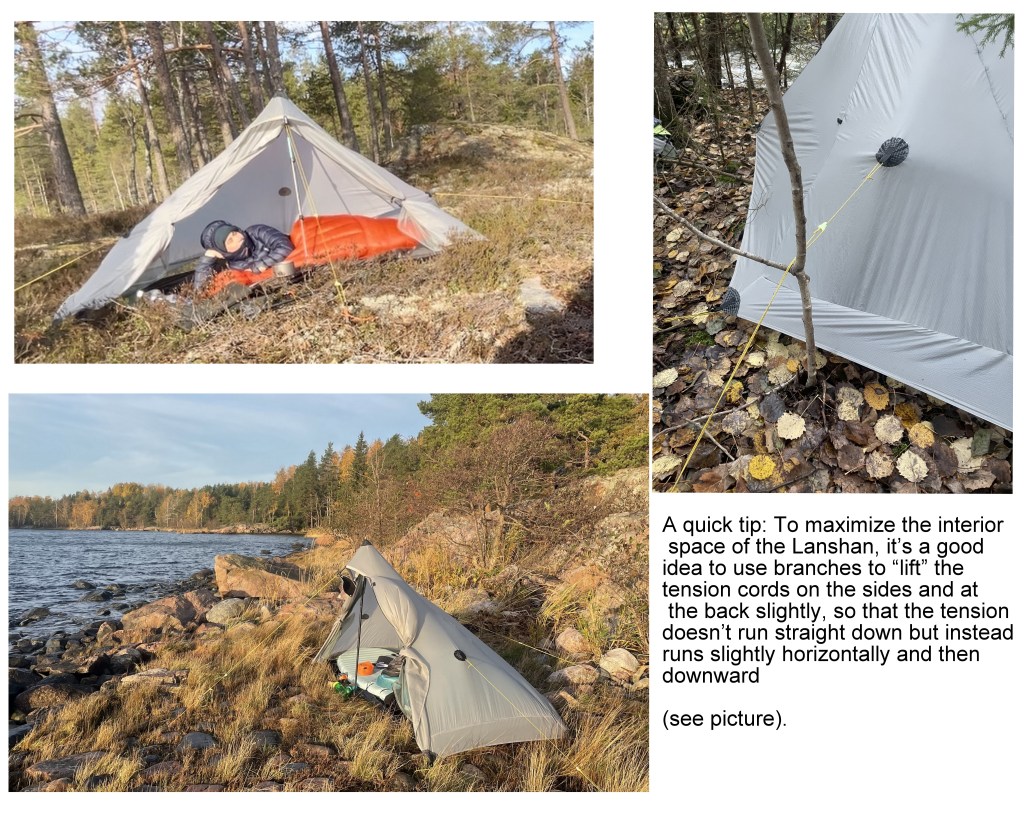
- “Single wall” or “double wall”: “Double wall” tents have an extra inner tent made of mesh fabric. The advantage of this is that if condensation forms during the night, it collects on the inside of the outer tent wall, keeping the inner tent wall dry. This means you don’t have to be as careful about not letting your sleeping bag touch the wall too much, etc. “Single-wall” tents are, of course, lighter in weight. Depending on the season, weather conditions, and where you’re sleeping, the inner wall may be more or less damp—or not at all. Ultimately, dealing with it is just a matter of getting used to it. A little moisture can either be wiped off in the morning or dried fairly quickly during the lunch break by hanging the tent up somewhere for a short while. Since lightweight tents are made of thin material, they dry quickly. (I have three “double-wall” tents and two “single-wall” tents).
- Otherwise, when it comes to tents, you also need to consider the material, ventilation system, and factors like weight and price. Prices range from €200 to €1,000, and weights from 500 g to 2.5 kg. In addition, there are also differences in size among 1-person tents. How much space is there inside the inner tent? Can you sit upright? How much space does the tent require when set up? Are there options for cooking partially sheltered from the weather? Is the tent also suitable for winter use?
- Suitability for winter use, light weight, ample space, and affordability were the key factors I looked for in the tents I bought for renting. The Carbon Reflex (my “old” tent), for example, is unfortunately not suitable for winter, as the lightweight poles might not be able to support the weight of snow on the roof. Thanks to the pyramid shape of the other tents, the snow slides right off.
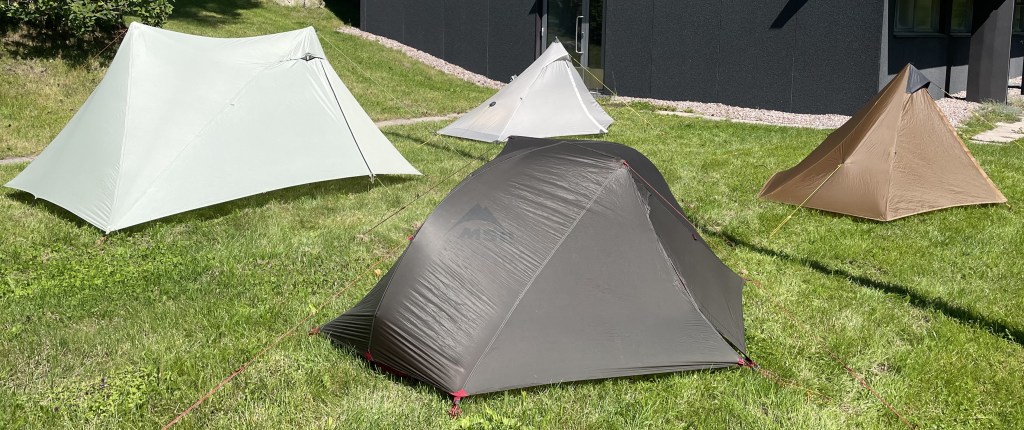
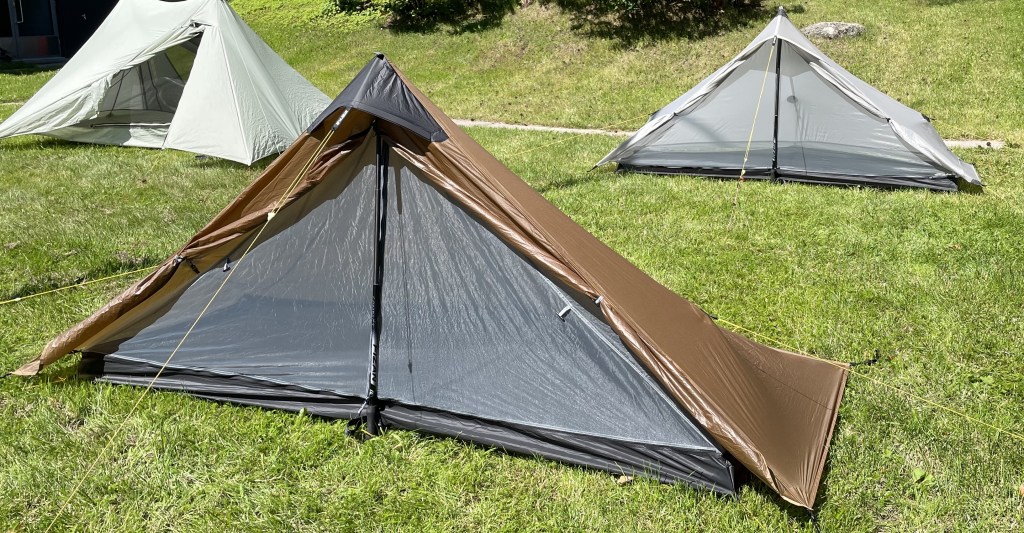
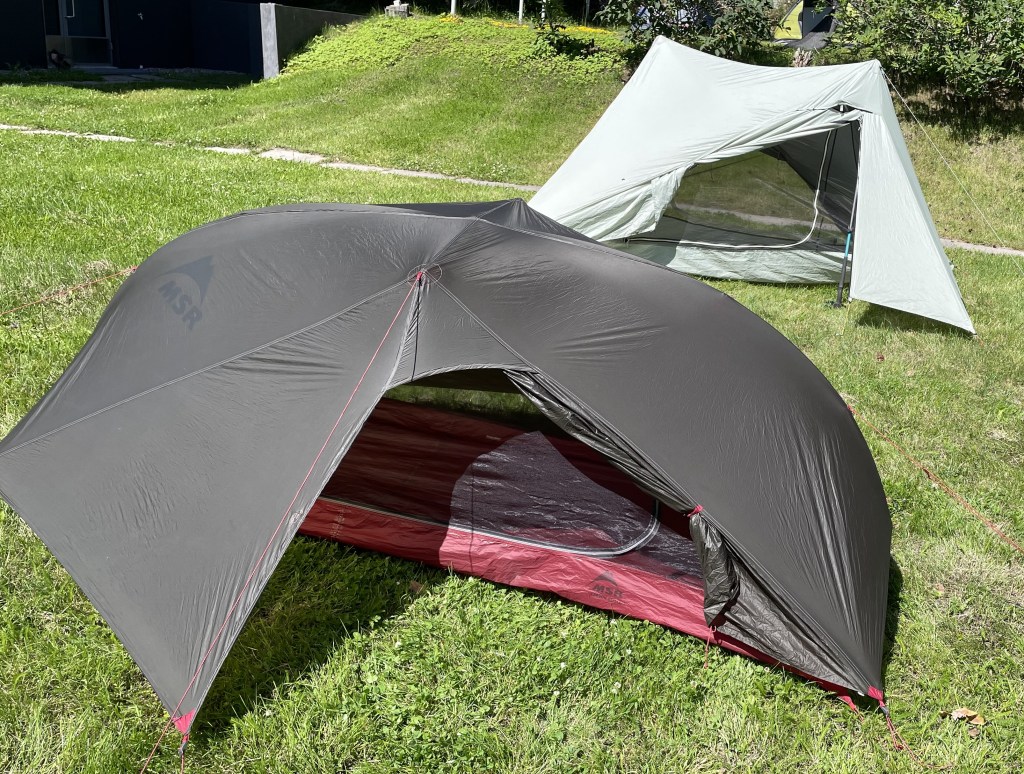
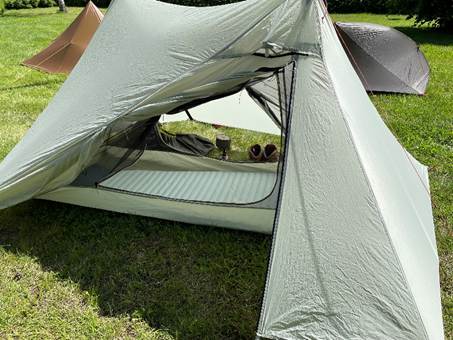
Here you can see the four different tents. All of them are ultralight, but their features vary greatly. Below, I’ll outline the key differences. First, I’ll highlight the main differences in a direct comparison, and then I’ll go into more detail about each tent individually.
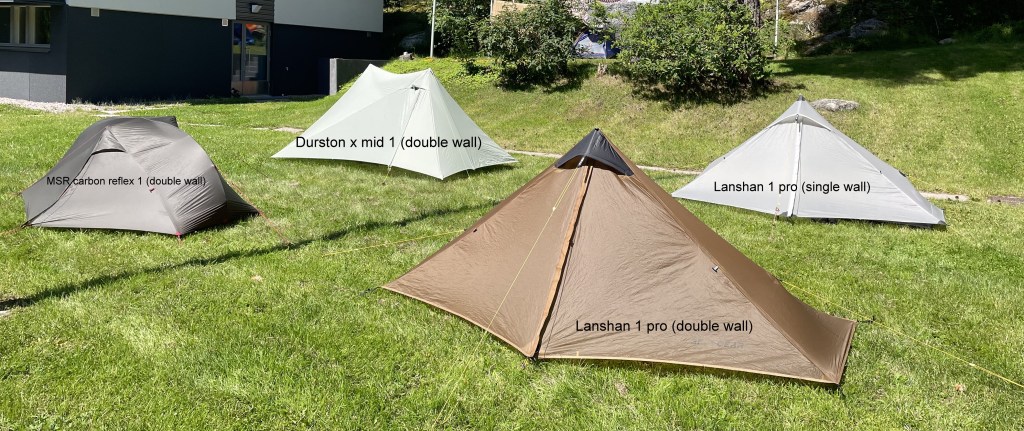
Size: From the outside, it’s already clear that the MSR tent is the smallest, both in terms of floor area and height, which naturally makes finding a place to sleep the easiest. Sitting upright is probably not possible for most people. The Durston X-Mid has the largest exterior surface area; thanks to its trapezoidal shape that tapers to a point at the top, you can sit upright across almost the entire sleeping area, but in inner space is pretty small. The Lanshan tents are slightly smaller in exterior surface area than the Durston, and of course, due to their pyramid shape, you can only sit upright in the center—but there it’s very comfortable, as it has a height of approximately 1.20 m and the inside space if the widest of all tents.
! You need two hiking poles to set up the Durston, one for the Lanshan, and none for the MSR tent!

Here you can already see that the Durston X-Mid opens from two sides.
Lanshan tents, whether double-walled or not, offer the widest panoramic view when open. With the MSR tent, in principle, only the right side of the door opens easily.
Here is an overview of the lengths and heights of both outer and inner tents.

In fact, the floor area of the Durston X-mid’s inner tent is about the same size as that of the MSR tent. The Lanshan tent has a relatively large interior space for a 1-person tent.
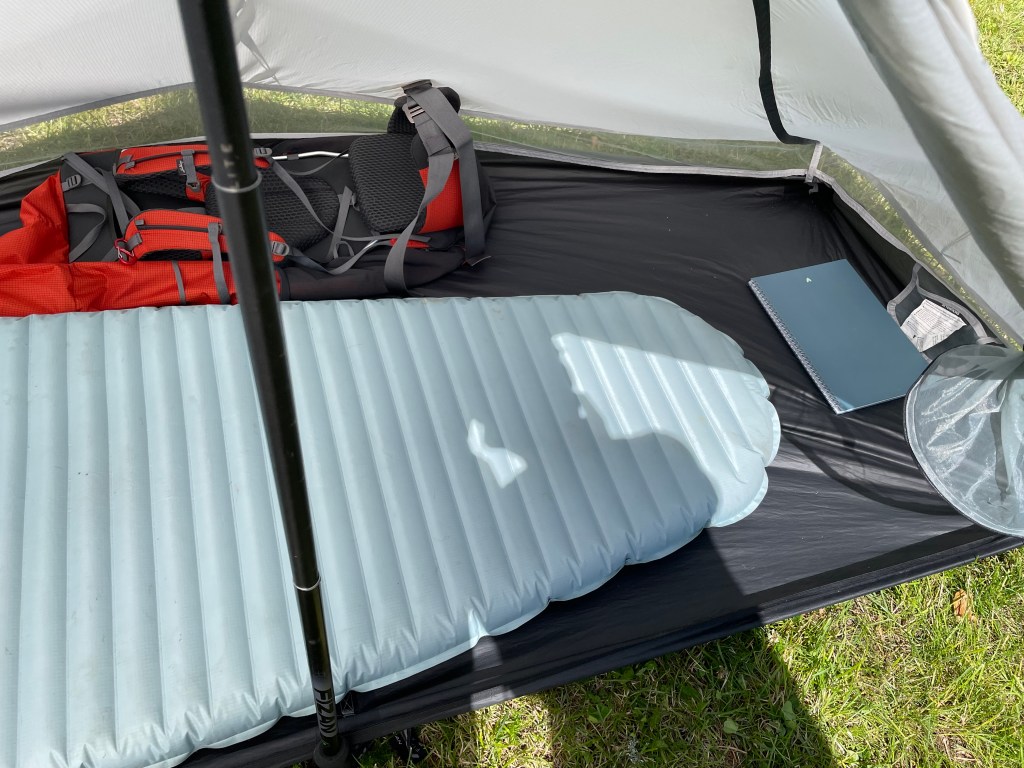
To illustrate the size and, consequently, the usability a bit more clearly, I have equipped the tents below with the same sleeping pad (Thermarest Neo Xtherm, Regular Wide: 64 cm x 183 cm), backpack, and stove to show where there would be space for gear. The grid is A4 size.
Lanshan-tents
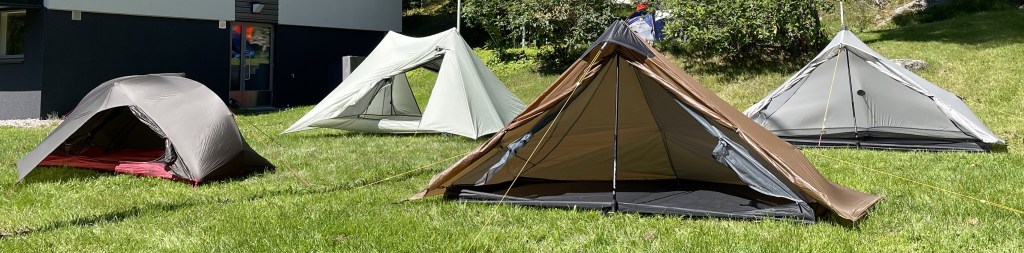
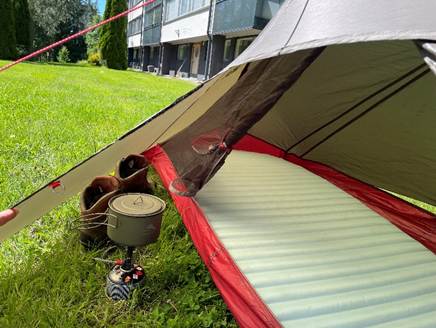
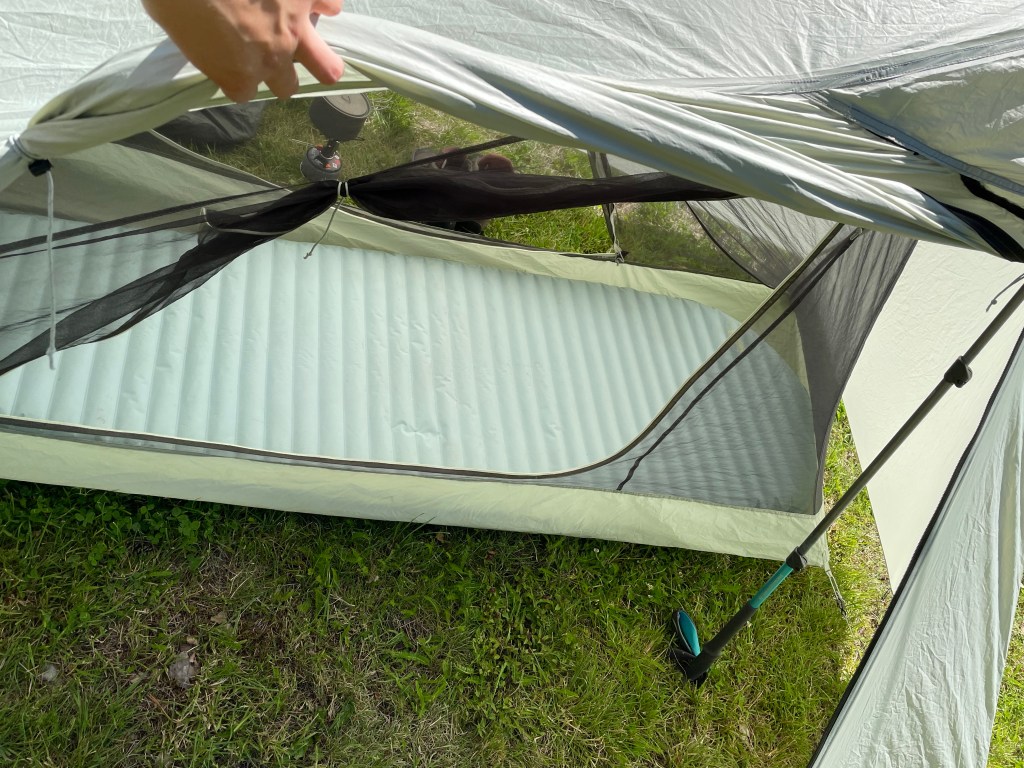
Here you can see the difference between the Lanshan tents (single-wall on the left and double-wall on the right). When you’re sitting inside the double-wall tent, it does feel a bit “smaller” in terms of space, but since you can touch the mesh and it hangs loosely inside the tent, the interior space is essentially the same size. As you can see, it’s easy to open just one door, giving you a weather-protected area for cooking.
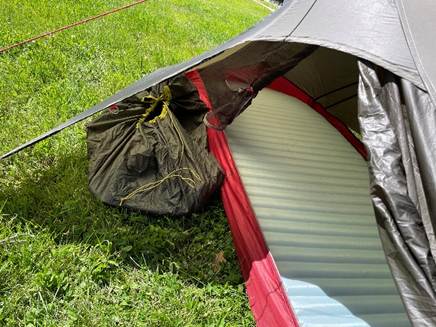
Since the interior isn’t rectangular but tapers outward at the back, there’s plenty of room for gear. You can even bring the entire backpack into the tent.
MSR-Tent
As you can see, the space under the door for cooking is quite a bit smaller than in the Lanshan tent. But it’s just a matter of getting used to it—it’s definitely doable! (I lived in this tent for over a month straight 😊)
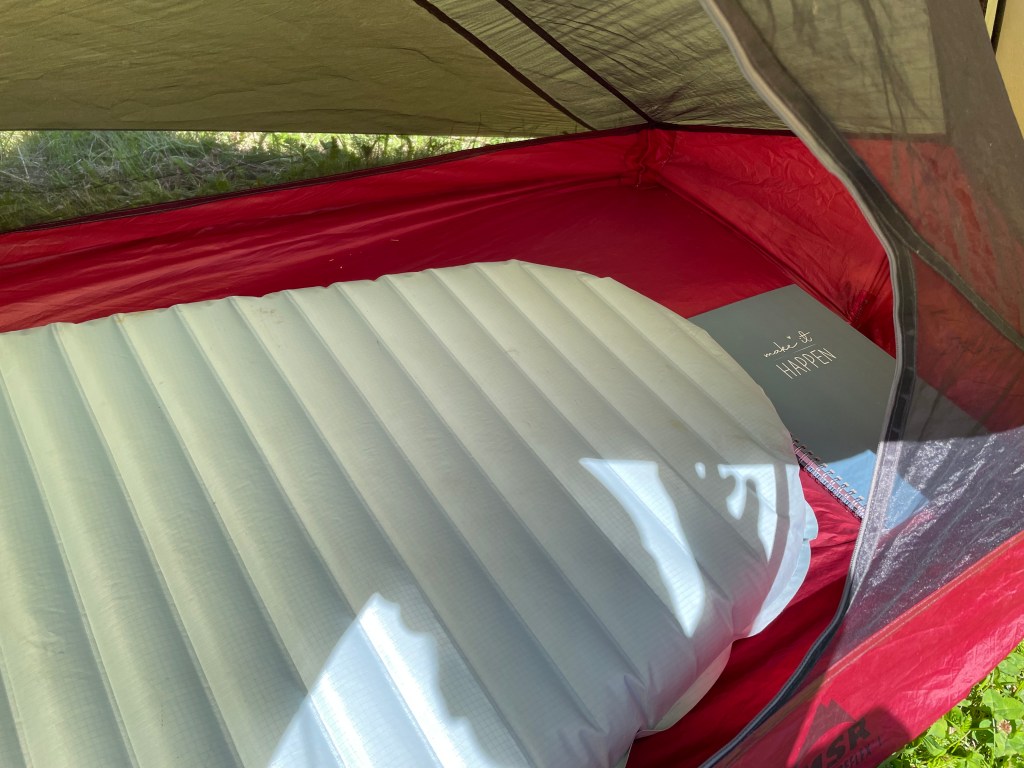
The interior of the inner tent is very small, but in my opinion, there’s room for everything you need. There’s obviously no space for the backpack, but as is often the case, it can be stowed under the left door. The backpack’s rain cover, for example, provides protection here against damp ground and condensation. It’s not necessary, but I find it convenient
One advantage of double-walled dome tents is that you can often set up just the inner tent and sleep under the open sky. Or, by contrast, the small MSR tent fits under almost any tree, making for a particularly cozy spot to camp.
Durston X-Mid
As you can see, the interior floor space is about the same size as that of the MSR tent. However, the Durston offers plenty of weather-protected space on both sides for gear or cooking. The MSR tent feels very much like a small “hideaway cave,” while the Durston, even when closed, offers a more “open” and very natural feeling, since you have forest floor, perhaps blueberry bushes, etc., all around your inner tent. Sometimes I enjoy the cozy little “hideaway cabin” of the MSR tent, and sometimes the openness of the Durston.
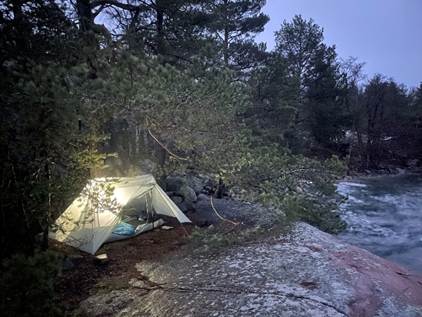
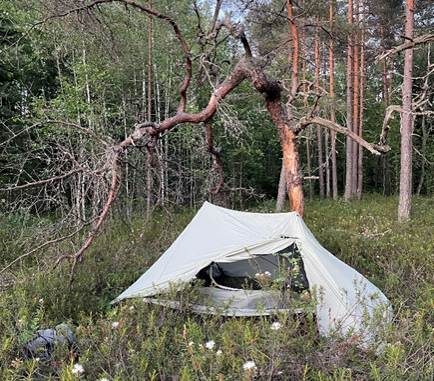
The Durston in the “undergrowth” and on rocky ground in the wind by the sea.
3. Sleeping
| 3. Sleeping | ✓ Sleeping pad (3-season) | -3xTheramrest xtherm regular wide (weight 540g, R-value 7,3, 183cmx64cm) -1x Thermarest Xtherm large (weight 570g, R-value 7,3, 196cmx64cm) |
| ✓ Foam pad (1/2) | 2x ½ thermarest z-lite sol 205 g 2x ½ kaira artic 130 g 2x kaira extreme 145 g | |
| ✓ Sleeping bag/ Quilt (3-season) | -3x Gramjakt UL Quilt -6C Regular / Wide V2, down (796g) | |
| ✓ Liner | -sea to summit reactor compact plus short -sea to summit reactor lightweight liner regular -sea to summit reactor regular – sea to summit reactor extreme regular -sea to summit reactor extreme long | |
| ✗ Pillow (pumpsack) |
General:
Sleeping pad: A 3-season sleeping pad has an R-value of 3–4. The R-value is a measure of thermal resistance, a guideline for how well the pad insulates. Of course, it always depends on how sensitive you are to the cold, but I would recommend going with a 4-value for 3-season. In any case, you’ll sleep much better if there’s no cold coming from below. (My sleeping pads have an R-value of 7.3, since I bought them for winter use as well. For comparison, the equivalent 3-season pad from Therm-a-Rest has an R-value of 4.5 instead of 7.3 and weighs 450g instead of 540g—a difference of just 90g.)
If you borrow a mat from me, I’d give you a thin foam mat to put underneath for extra protection. It’s not absolutely necessary. But I’ve gotten used to the luxury of having it along, since it lets you sit or lie down comfortably anywhere on the potentially damp forest floor during breaks. Of course, a foldable seat pad works just as well. Or nothing at all. I did my 1,500 km long-distance hike without one. But for the minimal extra weight, you really do get more comfort. Plus, it works as a second sleeping pad in the winter.
Sleeping bag: When it comes to sleeping bags, the “comfort rating” is particularly important; this indicates the temperature at which a woman won’t feel cold. Of course, this varies greatly from person to person depending on body type. The sleeping bag shouldn’t be too loose either, otherwise you’ll get cold much faster. The clothes you wear inside the sleeping bag also play a role, of course, etc. à For 3-season hiking, a sleeping bag with a -1°C comfort rating makes sense. Then you have to decide between down and synthetic sleeping bags. Down is more expensive, but lighter and takes up less space when packed. However, if it gets wet, down loses its insulating ability. Synthetic fiber is heavier and much bulkier.
In addition, there are a wide variety of sleeping bag liners, which are designed either just to keep the sleeping bag clean or to provide extra warmth.
Why do I have quilts to borrow but no sleeping bags?
– Quilts come from the ultralight tradition. They are sleeping bags without a back panel that can be fully opened up into a blanket. They also lack a hood (you need a hat to sleep, and depending on how sensitive you are to the cold, hooded sleepwear can’t hurt either. Personally, I often pull my fleece jacket over my head or even my down jacket.).
– The idea is that you can save on the material and weight of the back section because, since you’re lying on it, it loses its thermal performance anyway since the down is flattened.
– With the quilts I chose, I made sure that the foot section still closes securely and that it’s also possible to close the quilt around the shoulder and neck area so that the heat doesn’t escape. Some quilts don’t offer these features.
– I rent out quilts rather than sleeping bags because they adapt more flexibly to different body sizes; plus, you can combine them with another 3-season sleeping bag in winter to replace a winter sleeping bag. Dual function! They also offer plenty of versatility for 3-season use, ranging from a closed mode for colder days to an open mode as a blanket in the summer. If you rent a quilt, you will get also a sleeping bag liner, what can be washed easily after renting, so there is no need to wash the quilts every time after renting.
The following pictures are meant to give you an idea of how the quilt system works, in case you’re not familiar with it. The quilt is secured to the sleeping pad with two “straps.” Depending on the temperature or how warm you feel, you can pull the foot section and shoulder area tight. If it gets warm at night, you can either open a connection on just one side or both connectons. If it gets very warm, you can also turn the quilt into a blanket.
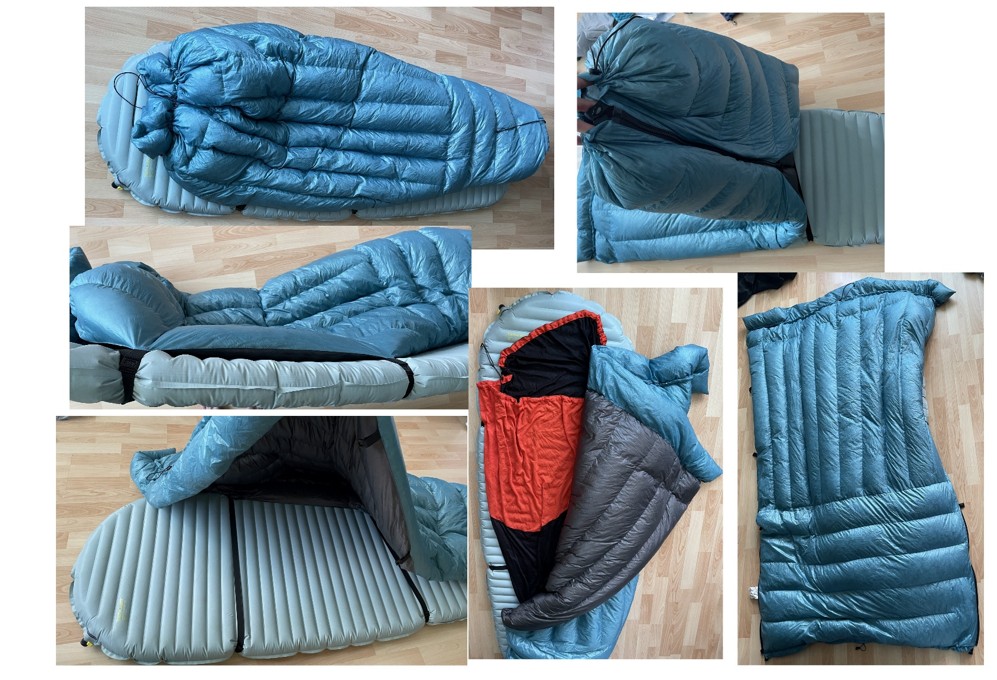
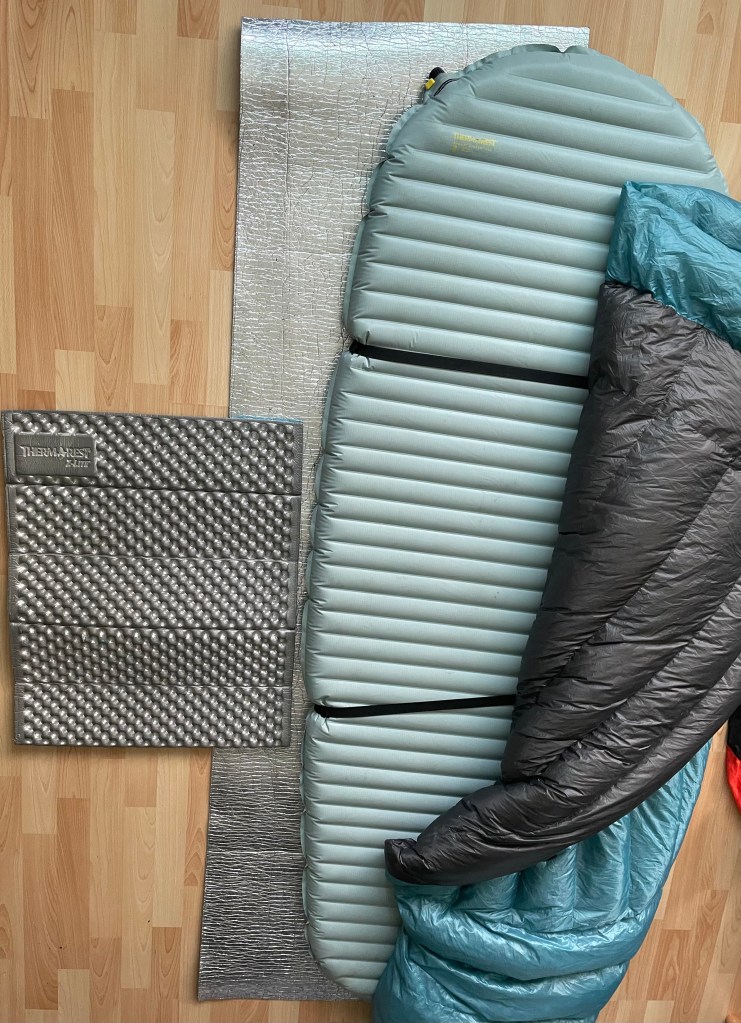
On the left, you can see two different types of foam sleeping pads to use as a base: a Therm-a-Rest Z-Lite Sol cut in half and a full-size Kaira Extreme.
Pillows: There are inflatable pillows designed for hiking that weigh practically nothing. Personally, I’ve never tried them; I just stuff my extra clothes into the pump sack of my sleeping pad or a dry bag and use that as a pillow.
Tips for staying warm at night:
– Always go to pee when you need to. When our bladders are full, we feel the cold more. That’s why it makes sense to drink in the early evening at the campsite and not right before bed.
– Don’t get into your sleeping bag when you’re cold. You are the heat source for your sleeping system. Move around a bit just before bed to warm up (but not so much that you start sweating, of course).
– An evening snack is also supposed to help.
– If your sleeping system isn’t warm enough, you can, of course, put on all the clothes you have. A “hot water bottle” can also help. Just fill your water bottle with hot water before going to sleep and take it with you into the sleeping bag. That’s why it’s a good idea to bring a more heat-resistant plastic bottle along with your PET bottles.
· If your tent got wet throughout the night because of rain on the outside or condensation in the inside, you could hang in up on some tree, when you make your lunch break, especially light-weight tents will dry in a few minutes. The same you can do with your sleeping bag. Also you might get wet on the day, having a dry and warm tent/sleeping bag in the evening is the most important.
4. Kitchen
| 4. Kitchen | ✓ Stove | -2x MSR PocketRocket 2 (73g) -1x MSR PocketRocket deluxe (83g) -3x kovea spider (168g) |
| ✗ Small gas | ||
| ✗ 2x lighter | ||
| ✓ Wind protection (stove) | DIY wind protection (3x) | |
| ✓ pot | –TOAKS LIGHT Titanium 700 ml pot (90g) 3x | |
| ✗ Small spoon | ||
| ✓ cup | -3x cup (wildo fold-A-cup) |
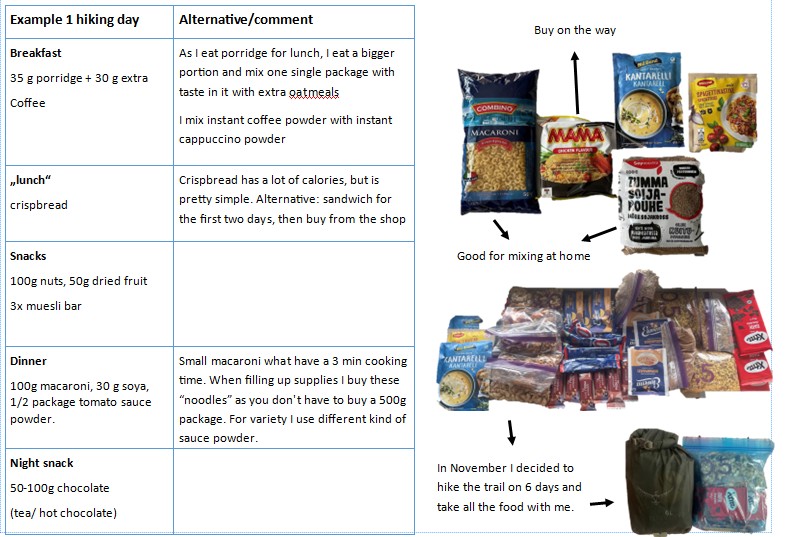
It’s a simple matter! In any case, this is all you’ll find in this document. You can also make pancakes while hiking and stock your “kitchen” a bit more, but unfortunately, I don’t have any experience to share in that regard. My experience and philosophy is that simple oatmeal and, in the evenings, especially quick pasta with tomato sauce make you extremely happy while hiking and taste much better than at home. And for that, a small pot (about 0.7 liters) and a small stove are enough—it’s really just about bringing water to a boil. A titanium pot is ideal for this. Titanium is the lightest material and very durable (though it’s not suitable for “more elaborate cooking,” as titanium burns easily).
Since titanium is scratch-resistant, you can also simply use a metal teaspoon from home.
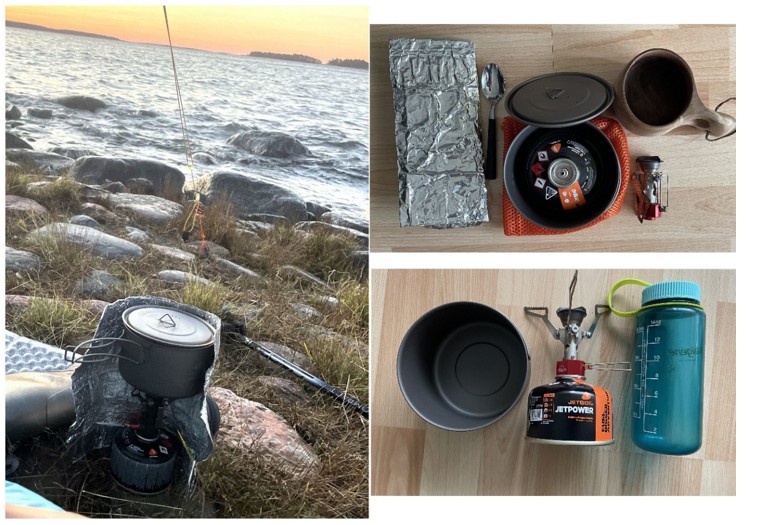
In the top right corner, you can see my “standard” set: DIY-windprotection, spoon, 0.7-liter pot, 100g can of gas, MSR Pocket Rocket 2 stove, and even though it’s heavy, I like to use my wooden cup. In the bottom right corner, for size comparison, the gas can and stove next to a 0.5-liter bottle. On the left, the whole setup. You can also buy an extra windprotectoin, but making your own is pretty easy. Just fold an aluminum tray “flat” and use aluminum tape to make adjustments.
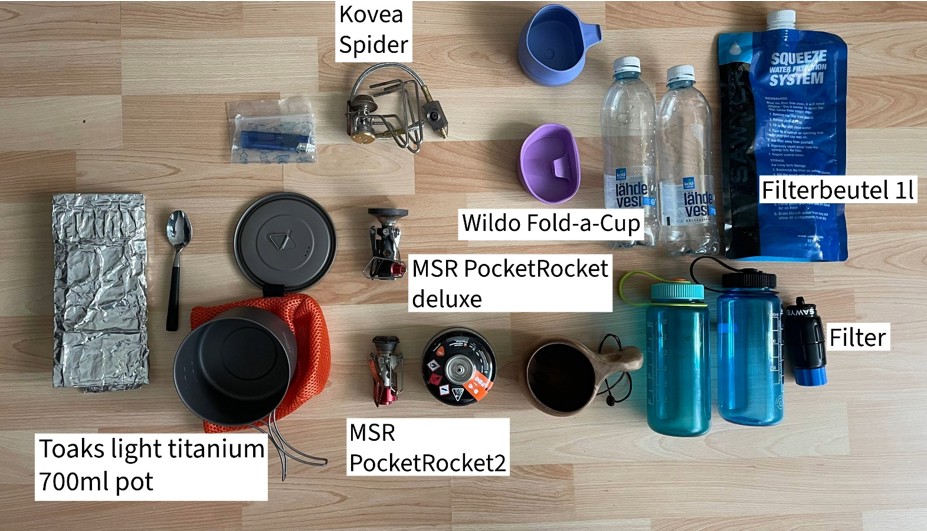
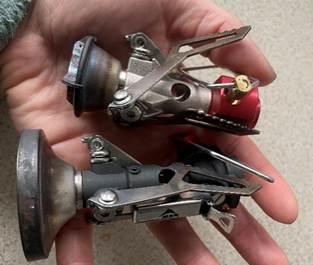
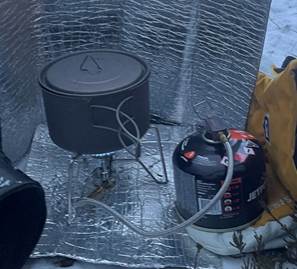
As you can see, there’s hardly any difference in size between the MSR Pocket Rocket 2 and the Deluxe version. Since the Deluxe version has a wider burner surface, the stove is naturally more efficient and heats up faster. It also has a built-in igniter. That means when you turn on the gas and press the button, the flame ignites automatically. Otherwise, you’d need a lighter. The PocketRocket2 is a bit cheaper, and I find it perfectly adequate. On the right side of the picture, you can see the Kovea Spider in use. This one has the advantage that you can turn the gas cartridge upside down in winter, allowing gas to flow to the stove even at lower temperatures. Personally, I prefer the setup for 3-season hiking, with the stove screwed directly onto the gas cartridge. But that’s definitely a matter of personal preference.
The following should just give you an idea how you could structure your food for the six days on that trail. What and how much you need differs so much from personal diets and energy need of your body.
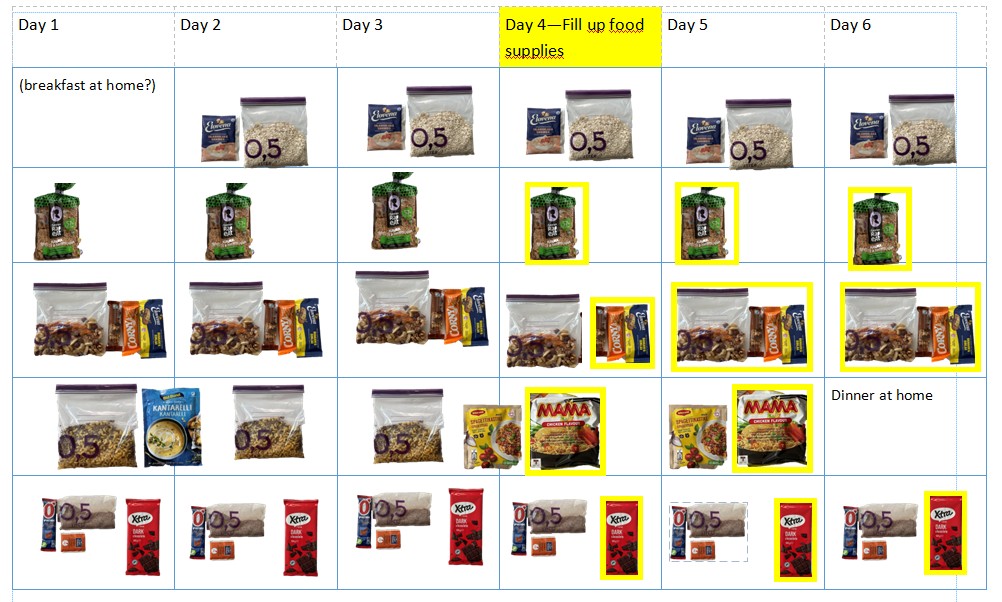
No frame = take with me from home // Yellow frame = Buy on day 4
5. Watersystem
| 5. Watersystem | ✓ Waterfilter + soft bottle (1l) | 3x Sawyer micro Squeeze set |
| ✗ 2x 0,5 pet bottle | ||
| ✓ 2x 0,5 Nalgene | 4 x 0,5 Nalgene |
A water filter—a piece of gear I never want to be without again. In fact, four years ago in 2022, I went on my first long hike of over 1,500 km without one. Out of ignorance. It worked out, but since you need water not only for drinking but also for cooking, it simply requires much more planning, and you have to carry a lot of water—and therefore weight—along the way. In Lapland, you can still drink unfiltered water straight from nature, but not here in southern Finland.
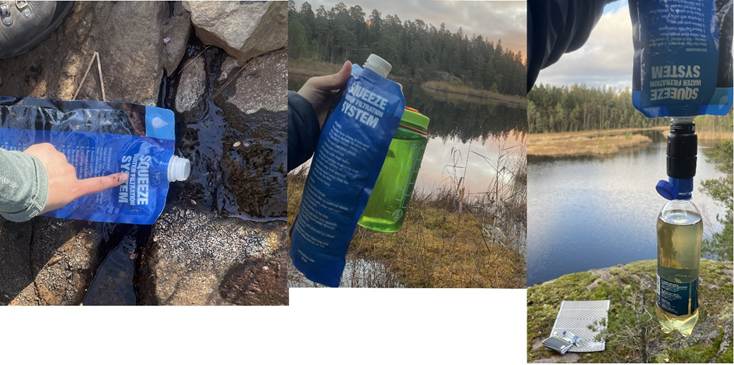
How does it work? The water to be filtered goes into the filter bag, and the filter is screwed onto it. Then you simply squeeze the bag, and clean water comes out the other side. You can let it flow directly into a pot, into a bottle with a wider opening, or screw a plastic bottle directly onto the other end of the filter.
Since the plastic filter bag has only a small opening, it can sometimes be difficult to fill the entire liter if, for example, there is only a small trickle of water available. Even holding it underwater in a lake sometimes doesn’t result in a full bag if it gets compressed by the water.
My solution: I use a 0.5-liter Nalgene plastic bottle with a wide mouth to “collect water” and then pour it into the bag. With this bottle and the bag, I can carry 1.5 liters of “dirty water.” I also have another 0.5-liter Nalgene and two 0.5-liter plastic bottles for “clean water.” So in total, I can carry 3 liters. This can be necessary if there’s no water source at the campsite (which happens sometimes). Otherwise, I carry 1–1.5 liters with me. In the trail guide are also marked spots where it’s easy to collect water. Ultimately, it comes down to personal preference: whether you’d rather stop more often to filter and carry less, or carry more and not have to worry about filtering as often. You can filter right on the spot or find a cozy spot to sit. I’ve already spotted an otter twice while sitting there quietly filtering.
Additional tips:– Make sure there is no air trapped in the filter bag; this will speed up the filtering process.
– If the water suddenly starts flowing more slowly, there may be too much pressure in the plastic bottle; loose the cap slightly, as you should in general avoid the pressure, as it’s not good for the filter anyway
– Eventually, the filter will need to be cleaned to prevent the flow rate from slowing down too much. To do this, either force cleaner water through from the other end using the included syringe, or hold it directly under the faucet, cup it with your hand, and try to force the water through ( often this has some water fountains as side effect)
– The filter must never freeze, so wear it close to your body in cold temperatures and store it in your sleeping bag at night. If the filter freezes, it will be ruined.
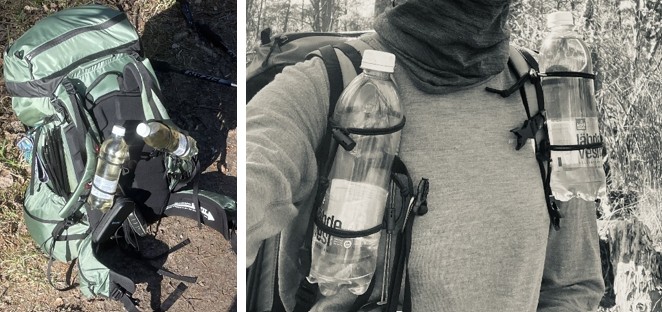
I would recommend to attach the two 0,5 pet bottles on the front side of your backpack, as you can see on the pictures. It gives you an easy access to drinking water while hiking and it enables a balance in weight as you have one liter on the front. You also safe space in your backpack like this.
Of course, you don’t have to use the same 4-bottle + bladder system that I do; the main thing is that you can carry about 3 liters somehow. Another option could be a 2-liter water bladder with a large opening on one side for drawing water from natural sources and a small opening on the other side for filtering, like the CNOC Vecto.
6. Rainclothes
| 6. Rainclothes | ✗ Rain pants ✓ rain skirt | 2x Northern Lite Sadehame (rain skirt) |
| ✗ Rain jacket | ||
| ✗ Poncho |
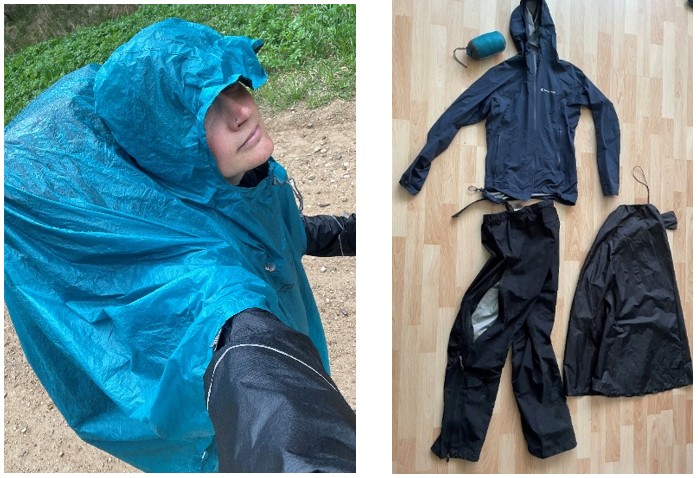
-Just as with rain pants, it makes a difference whether rain jackets have vents for ventilation. Of course, these can be practical for preventing sweating, but these jackets and pants are often more expensive and heavier as a result. I’d say it’s a matter of personal preference and habit.
-Rain skirts have grown in popularity among light hikers. Instead of rain pants weighing around 300–400g, they weigh only 75g. The weight and, of course, the ability to put them on and take them off quickly are advantages, as is the fact that you don’t really sweat. The downside is that the lower part of the pants gets wet, of course, and especially when you’re wading through thick underbrush (as happens on that trail), they’re rather impractical. When temperatures drop a bit, for example, I also prefer rain pants as they provide additional wind protection and a bit of warmth.
You can borrow a rain skirt from me!
-Poncho: I’ve been hiking for a long time with rain pants, a rain jacket, and a poncho. Since the poncho hangs over your head and backpack, water can’t collect between your neck and the backpack, for example. It’s definitely a great extra layer of rain protection, but not absolutely necessary. Ultimately, you should be prepared to get wet during the day while hiking anyway, so it’s important to make sure your change of clothes and sleepwear are packed in dry bags.
7. Boots
| 7. Boots | ✗ Hiking boots / trailrunners | |
| ✓ Barefoot-rubberbootsOr other creative swamp solutions | Vaistoa Katve Barfußgummistiefel (1040 g) Size 38-44 |
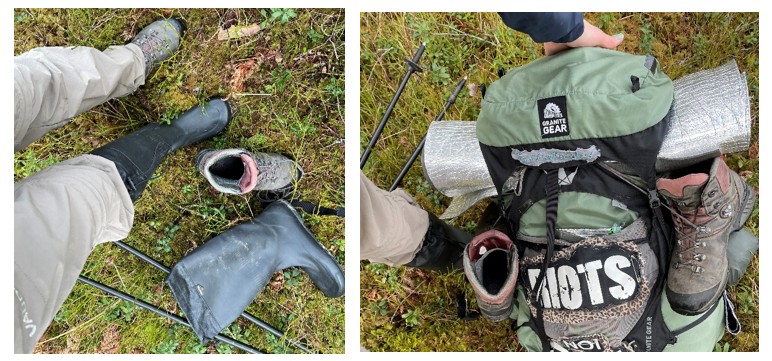
Whether you choose sturdy hiking boots or trail running shoes, the most important thing is to break them in beforehand, including with the socks. Blisters are good to avoid! In Germany, mountain boots have a long tradition as hiking shoes, while in Finland, rubber boots had been popular. Personally, in the more cold and wet months, I pretty much only hike in rubber boots. There are special hiking rubber boots that fit better and have a good tread.
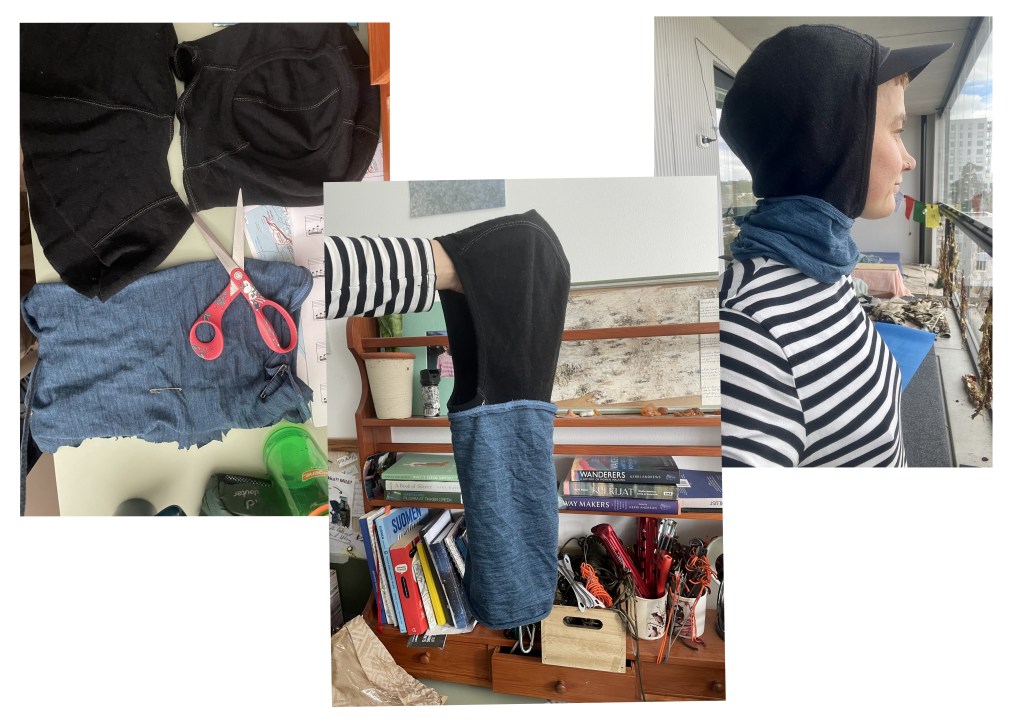
As an alternative, I’ve started testing barefoot rubber boots, since they’re foldable and can be taken along as “extra shoes.” I could lend these to you, and here you find a pdf with more options, what you could wear for the swamp parts 😉 .
8.Hiking poles
| 8. HIking poles | ✓ Hiking poles | – Black Diamon trekking poles – Fizan ultralight hiking poles |
I would definitely recommend them! Not only are they good for circulation, but they also provide stability on steeper sections and on wet, slippery rocks, help with crossing small streams or rivers, and are practically a must-have in the moors. An even more essential must-have if you decide to use a tent that’s set up with hiking poles.
Most hiking poles are adjustable, which is handy if you want to carry them on your backpack and, of course, for setting up the tent.
9. Day clothes
| 9.Day clothes | ✗ Hiking pants + underpants | |
| ✗ Hiking socks | ||
| ✗ Longsleeve Merino shirt (or/and t-shirt) | ||
| ✗ Fleecejacket | ||
| ✗ Rainjacket | ||
| ✗ Downjacket (3-season) | ||
| ✗ Buff | ||
| ✗ Cappy | ||
| ✗ Gloves |
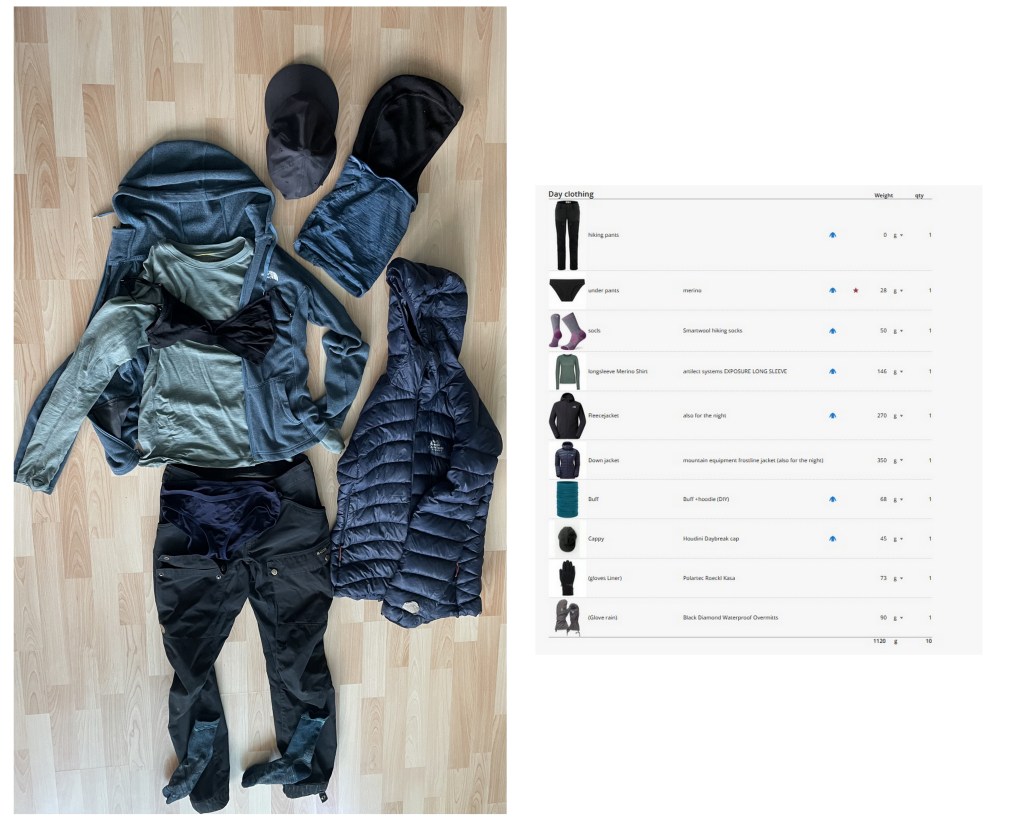
Clothing: Comfort and protection! A base layer keeps you dry and therefore warm (e.g., merino), a mid-layer provides extra warmth (e.g., fleece), and an outer layer (rain jacket) protects against wind and rain. I don’t want to go into too much detail about clothing—merino is a good standard material for hiking, but there are, of course, other options as well. Just be sure to avoid cotton—it doesn’t really dry and once it gets wet it feels cold, whereas merino dries quickly and retains its warmth even when wet. Since the clothing system is a layering system, it makes sense to buy the outer layers a bit larger so they fit comfortably.
Here’s an example of what I’d wear in September. If it’s very warm, I might bring a T-shirt, but most of the time I find a thin, long-sleeved merino shirt to be a good base layer.
As for the pants, you might want to consider whether mosquitoes can bite through them. That’s why thin leggings aren’t really suitable. However, by September, mosquito season is pretty much over.
For the 6-day hike, you obviously don’t need to buy merino underwear. If you plan to go on more and longer hikes in the future, I definitely find them very comfortable and easy to wash and dry on the trail. In the summer, I also like to go swimming in a merino bra and underwear when swimming naked isn’t an option, and everything is dry again in just a few hours. Depending on the weather forecast, a thin pair of gloves probably makes sense too. Take whatever you have! There are plenty of options. I like to use slightly sturdier Polartec liner gloves; unlike merino liners, they keep out a bit more moisture. Influenced more by winter hiking, I also use waterproof mittens to pull over them. Mine are sturdier because they’re designed for winter, but there are also thinner, waterproof, ultra-light rain mittens. Probably not necessary for the whole 3-season time, but for cold, rainy hiking days, the combination of thin liners and rain protection is a dream for cold fingers.
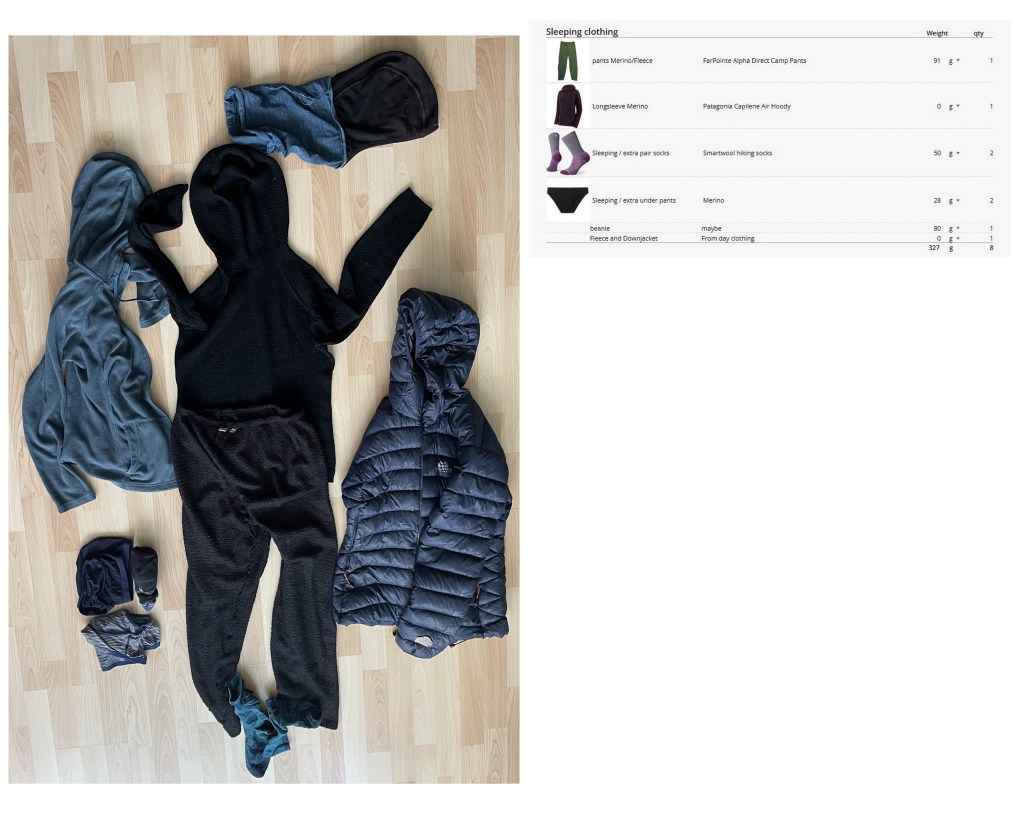
10. Sleeping clothes/Extra clothes
| 10. Sleeping clothes/Extra clothes | ✗ Merino/Fleece pants | |
| ✗ Merino-Longsleeeve | ||
| ✗ 2x extra pair of socks | ||
| ✗ 2x extra underpants | ||
| ✗ beanie | ||
| ✗ (Fleece + down jacket from the day) |
Here’s an example of what I would pack:
11. Repair kit
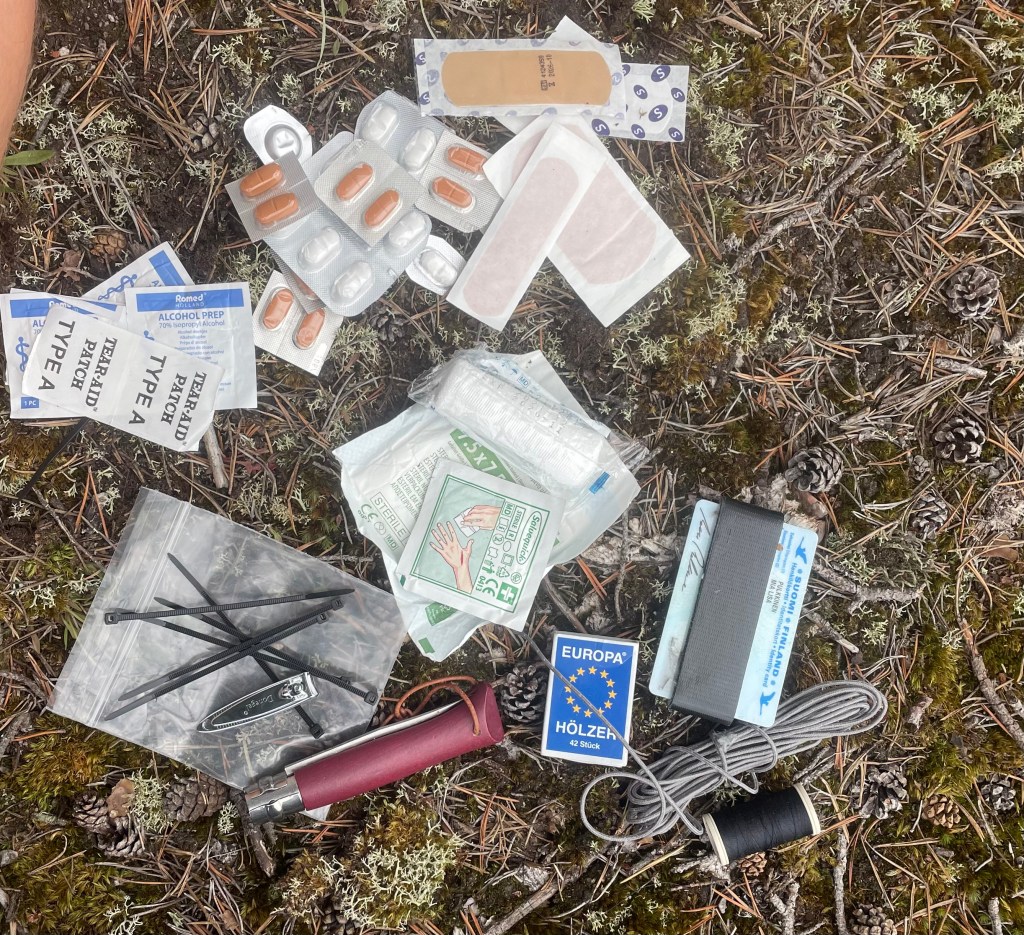
| 11. Repair kit | ✓ For example: Repair patch sleeping pad; Cord; Needle and thread; Tape |
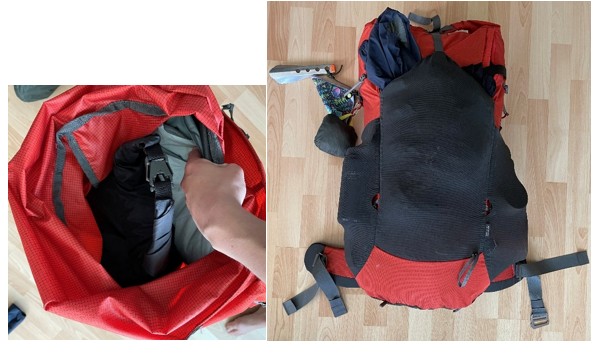
In the photo, you can see a small repair kit + first aid kit (the tweezers are missing!).
12. Hygiene
| 12. Hygiene | ✗ Toilett paper in zipper bag | |
| ✗ Hand desinfektion gel | ||
| ✗ Dog-bags | ||
| ✓ Trowel | 3x trowel | |
| ✗ Pee rag | ||
| ✗ Basic/personal Hygiene stuff, like: toothbrush, toothpaste, Deo, Menstruation stuff, evtl suncreme, .. | ||
| towel |

Toilet paper: Remove the cardboard tube from the inside and “pull” the paper out from there. This way, the roll can be flattened inside a zip-top bag, and you can take paper directly from it.
Poop trowel: Dig a hole as deep as the scoop is long, put the toilet paper in, and cover it up. If it’s not possible to dig the hole that deep, it’s better to take the toilet paper with you in a dog waste bag and dispose of it in the nearest trash can. This may actually be the more sustainable option, since toilet paper still takes several years to decompose. You don’t have to buy a reusable toilet wipe just for a single hike, but it’s really practical for regular use. Depending on the length of the hike—that is, whether you wash up or go swimming along the way—a small towel makes sense, of course. When it comes to menstruation, I’d say just use whatever you normally use. A menstrual cup is handy, of course, since you don’t have to carry around any trash, but you do need water to rinse it out every now and then.
Other than that, I don’t bring anything else—just a toothbrush, a small travel-size tube of toothpaste, and deodorant. There are also small “wilderness shampoos” available, but I don’t think they’re necessary for a 6-day trip. Some people like to bring a small pack of wet wipes as well. But the most important thing is hand sanitizer. You absolutely want to avoid getting a stomach disease from poor hand hygiene 😊 But if that does happen…
13. First aid
| 13. First aid | ✗ Important: Pain relievers/fever reducers and medication for diarrhea/vomiting. Otherwise, bring any personal medications , plaster, blister plaster etc Tweezers (ticks)Nail scissors/nippers |
… It’s really important to make sure your first-aid kit includes medication for diarrhea and vomiting. You don’t really need a separate wound disinfectant spray—hand sanitizer works just as well.
14. Electronic
| 14. Electronic | ✓ Powerbank +charger | 1x Nitecore NB20000 (328g) 2x Wave Power bank 20000 mAh (385g) 2x 6700 mAh (162g) |
| ✓ GPS-device + batteries | 1x Garmin Etrex 22x 1x Garmin Etrex 32x | |
| ✓ headlamp + batteries | Different basic headlamps | |
| ✗ mobile phone + charger | ||
| ✗ headphones |
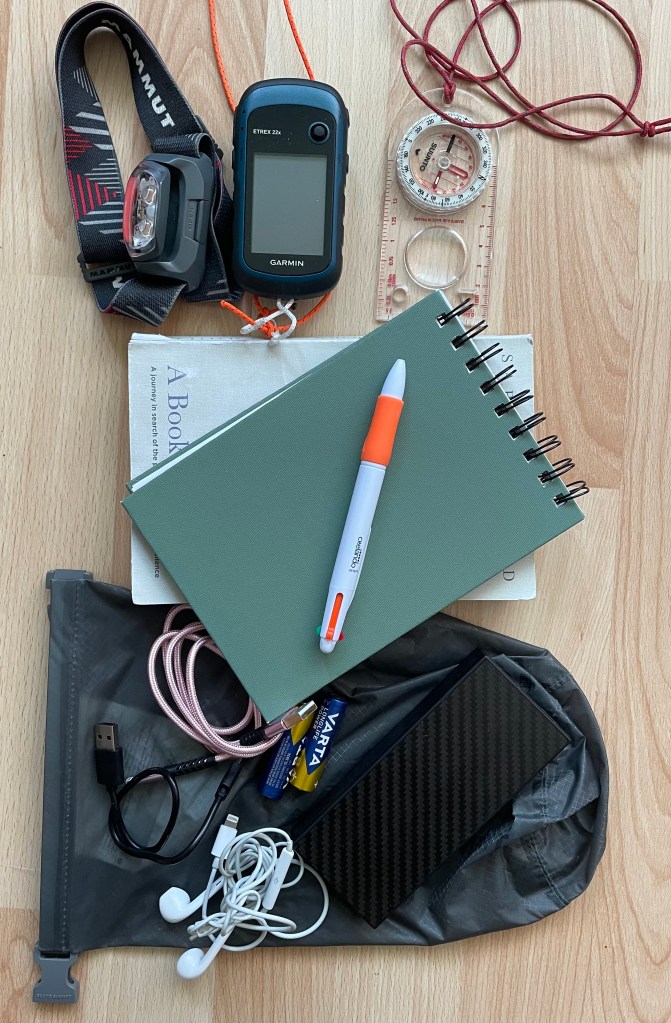
About the GPS device: You’re welcome to bring your own and load the trail onto it beforehand. I also purchased and installed the detailed topographic map of Finland for mine, which is helpful for the “off-trail” sections. However, the free Finnish app “karttaselain” also works well for getting an overview of the terrain (you’ll get more information about this in the trail guide). You can also navigate using the Outdooractive app or Komoot on your phone.
In general, I find GPS devices useful if you hike frequently or for long periods, since they naturally save your phone’s battery.
15. Extras
| 15. extras | ✓ compass | |
| ✗ Oropax? | ||
| ✓ Trailguide | ||
| ✗ Hiking journal + pen | ||
| ✗ Pocket knife | ||
| ✗Belly bag | ||
| ✗ Something like “wilderness-wash” | ||
| ✗ “Luxury-objects” |
You don’t necessarily need a compass—you can use your phone for everything—as we’re not in the wilderness of Lapland, where you should bring one along. Thus it’s not that heavy, and you can also practice to orientate with it on that trail (you will find more information on that in the trail-guide). Otherwise, the “Extra” section is there to help you figure out what you need for your own “well-being/luxury” or “personal interests.”
In the summer, when it stays light for a long time, I like to bring a real book; during the darker months, I prefer reading on an e-reader and also listen to more audiobooks while watching the moon’s shadows on my tent or the clouds in the sky when the door is open 😊
In the trail-guide you will find a template for inspiration for a hiking journal. Sometimes I bring my “regular” journal, and sometimes a small extra notebook just to record the hike.
I also like to use a belly bag for my snacks and such, but if the backpack has roomy side pockets, that’s pretty much unnecessary.
Step 1: You can save a lot of space if, instead of rolling up your air mattress and packing it as a “bundle” in your backpack, you fold it so that it fits snugly against the back panel inside the backpack. That way, it lies flat against that surface.
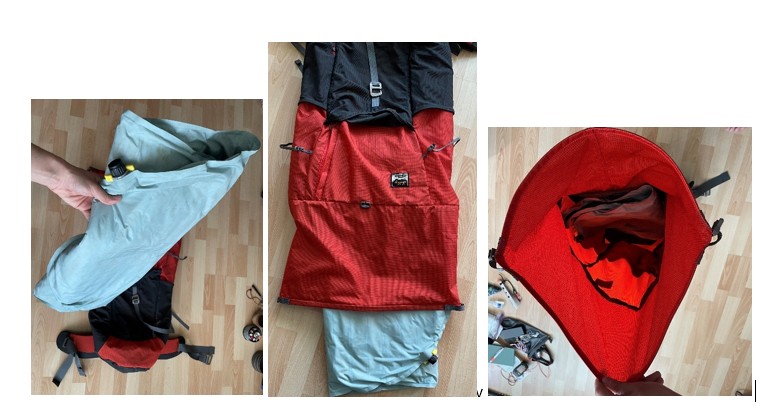
Step 2: Next, place the liner inside the backpack. Instead of packing your sleeping bag as a “bundle in its compression sack,” you can simply tuck it into the liner first, without compressing it. However, if your sleeping bag is very bulky, it’s better to use the compression sack. The advantage of stuffing the sleeping bag to the bottom of the liner is that the entire volume of the backpack is utilized. This also creates an even base in the lower part of the backpack, which helps distribute the weight evenly. This way, the bottom section isn’t too heavy. Depending on how many extra dry bags you use, you can add them after the sleeping bag. Or, as shown in the picture on the right, you can put your clothes in the sleeping pad’s stuff sack and add them that way. Everything that needs to stay dry goes into the liner.
Step 3: Then close the liner, and on top of that you can pack your tent and/or cooking gear and food, for example. Personally, I love backpacks with spacious exterior pockets. You can put everything in there that doesn’t need to be weatherproof and that you’ll need during the day, so you don’t have to rummage through your backpack as often (rain gear, cooking supplies, etc.).
Ultimately, your packing strategy depends a lot on your backpack and gear, of course. But it’s important to keep the weight close to your back and higher up. It really makes a world of difference when the weight is distributed properly. A good strategy also means knowing where your things are, but of course that comes with experience, routine, and getting to know your own gear 😊
